#configuring VMkernel ports
Explore tagged Tumblr posts
Visit Tumblr Blog
Explore Tumblr blogs with no restrictions, modern design and the best experience.
Last Seen Tumblr Blogs


Fun Fact
1,644 Tumblr posts in 1 second.
Text
VMware Networking: 5 Concepts to Master
VMware Networking: 5 Concepts to Master #homelab #selfhosted #vmware #VMwareNetworkingEssentials #vSphereStandardVsDistributedSwitch #ManagingMultipleUplinks #UnderstandingVMwareFailovers #MasteringLoadBalancingInVirtualEnvironments #VLANTaggingInVMware
One of the challenges when getting into virtualization using VMware ESXi and vSphere with vCenter Server is understanding the many different networking concepts. There are a few foundational concepts in the VMware networking layer that you need to understand and master that will provide a basis for building your environment connected to the virtual network in your VMware environment. Table of…
View On WordPress
#configuring VMkernel ports#ensuring security with virtual switches#managing multiple uplinks#mastering load balancing in virtual environments#optimizing virtual and physical network communication#understanding VMware failovers#VLAN tagging in VMware#VMware network traffic management#VMware networking essentials#vSphere Standard vs Distributed Switch
1 note
·
View note
Text
Vmware Vcenter Server 6.0

Vmware Vcenter Server 6.0 Crack
Vmware Vcenter Server 6.0 Windows 10
Vmware Vcenter Server 6.0 Download Free Trial
In previous post of this series, we’ve learnt about vCenter Server Architecture, such as its components, services, and Platform Services Controller (PSC). If you’ve missed previous posts of this series, you can find them here.
In this post, we’ll learn installing vCenter Server step-by-step in windows environment. When vCenter Server is installed, following services are also installed with it.
For complete guidance regarding vCenter Server installation and configuration, you can follow VMware vSphere 6.0 Part 2 – vCenter, Alarms and Templates course. In next post, we’ll see how vSphere Web Client works and used for managing and controlling vCenter Server. VMware's vCenter server appliance 6.0 has the same scalability numbers as the windows installable server. It seems that there is no reason to avoid the installation of vCenter appliance again. Buy one Microsoft windows server license less next time.I will not go through an installation guide since there are plenty of these published on the. Click Finish to complete the installation. Installing the VMWARE vCenter Server Appliance 6.0. Double Click the index.html file in the root of the DVD. Ensure pop up blockers to no block the Client Integration Plugin. Select Allow, so the VMware Client Integration Plug-In can access the operating system.
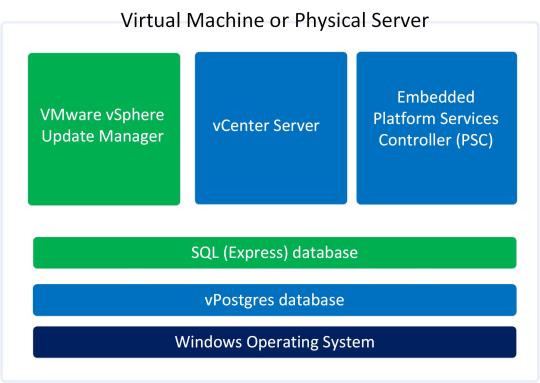
vCenter Server
vSphere Web Client (enables to connect to vCenter Server instance using web browser)
VMware Inventory Service (stores vCenter Server application and inventory data)
vSphere Auto Deploy (support tool that can provision many physical hosts with ESXi software)
vSphere ESXi Dump Collector (configure ESXi to dump the VMkernel memory to a network server, rather than to a disk)
vSphere Syslog Collector (support tool that provides a unified architecture for system and network logging)
vSphere Web Client directly communicates with vCenter Server, and vSphere Client is used to directly communicate with ESXi hosts. vCenter Server provides access to the ESXi hosts via an agent called vpxa.
Minimum Hardware Requirements for vCenter Server
Before installing and configuring vCenter Server, we should consider minimum hardware requirements. Following are the minimum hardware requirements. We’re installing vCenter Server in home-lab environment, so we’ll install it as embedded PSC with 2CPUs and 4GB RAM.
Let’s start the process:
Step 1: Download the vCenter Server ISO from VMware site. After downloading, mount it on CD/DVD drive
Step 2: Open the mounted path and double click the Autorun.exe to start the process.
Step 3: Select vCenter Server for Windows and click Install to begin the installation.
Vmware Vcenter Server 6.0 Crack
Step 4: Windows Installer preparing to install in process, click Next to install vCenter Server 6.0.0
Step 5: Accept the License Agreement and click Next
Step 6: Select Embedded Deployment and click Next
Vmware Vcenter Server 6.0 Windows 10
Step 7: Enter the System Name as FQDN and click Next
Step 8: Select Create New vCenter Single Sign-On domain, enter vCenter Single Sign-On password, Confirm password, Site name, and click Next
Step 9: Select Use Windows Local System Account and click Next
Vmware Vcenter Server 6.0 Download Free Trial
Step 10: Select Use an embedded database (vPostgres) and click Next
Step 11: Verify Configure Ports and click Next
Step 12: Leave Destination Dictionary default and click Next
Step 13: Review your settings and click Install
Step 14: vCenter Server installation process will start now, and will take some time to install.
Step 15: Installation process is completed, click Finish or Launch vSphere Web Client
vCenter Server installation is completed when you click Finish button. When you’ll click on Launch vSphere Web Client, it will launch vSphere Web Client. For complete guidance regarding vCenter Server installation and configuration, you can follow VMware vSphere 6.0 Part 2 – vCenter, Alarms and Templates course. In next post, we’ll see how vSphere Web Client works and used for managing and controlling vCenter Server.
I hope you’ve enjoyed reading this post, if you have any query or suggestion, please feel free to write in comments. Thanks a lot.
Author: Nisar Ahmad
Systems Engineer, double VCP6 (DCV & NV), 5 x vExpert 2017-21, and the owner of My Virtual Journey, with experience in managing a Datacenter environment using VMware and Microsoft Technologies. This blog mainly covers virtualization and cloud technologies but also covers some other technologies such as Cyber Security, Quantum Computing, etc.
VMware vCenter Converter Standalone 6.0 | 14 May 2015 | Build 2716716
Check periodically for additions and updates to these release notes.
What's in the Release Notes
These release notes cover the following topics:
Introduction to Converter Standalone
VMware vCenter Converter Standalone provides an easy-to-use solution to automate the process of creating VMware virtual machines from physical machines (running Windows and Linux), other virtual machine formats, and third-party image formats. Through an intuitive wizard-driven interface and a centralized management console, Converter Standalone can quickly and reliably convert multiple local and remote physical machines without any disruptions or downtime.
Benefits
Convert physical machines running Windows or Linux operating systems to VMware virtual machines quickly and without any disruption or downtime.
Convert third-party image or virtual machine formats such as Parallels Desktop, Symantec Backup Exec System Recovery, Norton Ghost, Acronis, StorageCraft, Microsoft Virtual Server or Virtual PC, and Microsoft Hyper-V Server virtual machines to VMware virtual machines.
Enable centralized management of remote conversions of multiple physical servers or virtual machines simultaneously.
Ensure conversion reliability through quiesced snapshots of the guest operating system on the source machine before data migration.
Enable non-disruptive conversions through hot cloning, with no source server downtime or reboot.
What's New
The VMware vCenter Converter Standalone 6.0 provides:
Support for virtual machine hardware version 11.
Compatibility with vSphere 6.0 and Workstation 11.
Support for additional guest operating systems: Red Hat Enterprise Linux 7, Ubuntu 14, CentOS 6-7, Windows Server 2012 R2, Windows 8.1.
Support of pure IPv6 environments.
Proxy mode.
File-level cloning for volumes with ReFS file system.
Support for XFS file system.
Support for predictable network interface names.
VMware vCenter Converter Standalone 6.0 Support Notice
VMware vCenter Converter Standalone 6.0 is the last release of the product to support third-party backup images and virtual machines as sources for conversion. This capability will be discontinued in the next release. If you use this capability, you should start planning your transition. For the full list of the third-party backup images and virtual machines see Interoperability.
Installation Notes
You can download, install, and run VMware vCenter Converter Standalone in English only.
Users with limited rights cannot install Converter Standalone on Windows. You must log in as an administrator to install Converter Standalone.
Platforms
You can install VMware Converter Standalone 6.0 on the following platforms:
Windows Server 2003 R2 SP2 (32-bit and 64-bit)
Windows Vista SP2(32-bit and 64-bit)
Windows Server 2008 SP2 (32-bit and 64-bit)
Windows Server 2008 R2 (64-bit)
Windows 7 (32-bit and 64-bit)
Windows 8 (32-bit and 64-bit)
Windows 8.1 (32-bit and 64-bit)
Windows Server 2012 (64-bit)
Windows Server 2012 R2 (64-bit)
Interoperability
Converter Standalone 6.0 supports the following sources.
Physical machine running an operating system noted in Supported Guest Operating Systems
VMware Desktop products
Workstation 10.x and 11.0
Fusion 6.x and 7.0
Player 6.x and 7.0
VMware vCenter virtual machines
vSphere 6.0
vSphere 5.5
vSphere 5.1
vSphere 5.0
vSphere 4.1
vSphere 4.0
Third-party backup images and virtual machines - to be discontinued. See Support notice.
Acronis True Image Echo 9.1 and 9.5, and Acronis True Image Home 10 and 11 (.tib)
Symantec Backup Exec System Recovery (formerly LiveState Recovery) 6.5, 7.0, 8.0, and 8.5, and LiveState Recovery 3.0 and 6.0 (.sv2i format only)
Norton Ghost version 10.0, 12.0, and 14.0 (.sv2i format only)
Parallels Desktop 2.5, 3.0, and 4.0 (.pvs and .hdd). Compressed disks are not supported
Parallels Workstation 2.x (.pvs). Compressed disks are not supported. Parallels Virtuozzo Containers are not supported.
StorageCraft ShadowProtect Desktop, ShadowProtect Server, ShadowProtect Small Business Server (SBS), ShadowProtect IT Edition, versions 2.0, 2.5, 3.0, 3.1, and 3.2 (.spf)
The Microsoft VHD format for the following sources:
Microsoft Virtual PC 2004 and Microsoft Virtual PC 2007 (.vmc)
Microsoft Virtual Server 2005 and 2005 R2 (.vmc)
For conditions and limitations about converting Backup Exec System Recovery, ShadowProtect, and Consolidated Backup images, see the VMware vCenter Converter Standalone User's Guide.
Depending on the selected source, you can convert it to the following destinations.
VMware vCenter virtual machines
ESX 4.0 and 4.1
ESXi 4.0, 4.1, 5.0, 5.1, 5.5 and 6.0
vCenter Server 4.0, 4.1, 5.0, 5.1, 5.5 and 6.0
VMware Desktop virtual machines
VMware Workstation 10.x and 11.0
VMware Player 6.x and 7.0
VMware Fusion 6.x and 7.0
Earlier releases of Converter Standalone (versions 3.x, 4.x and 5.x) might not be compatible with VMware vSphere 6.x.
Supported Guest Operating Systems
Converter Standalone 6.0 supports the following guest operating systems:
Windows Server 2003 R2 SP2 (32-bit and 64-bit)
Windows Vista SP2 (32-bit and 64-bit)
Windows Server 2008 SP2 (32-bit and 64-bit)
Windows Server 2008 R2 (64-bit)
Windows 7 (32-bit and 64-bit)
Windows 8 (32-bit and 64-bit)
Windows 8.1 (32-bit and 64-bit)
Windows Server 2012 (64-bit)
Windows Server 2012 R2 (64-bit)
CentOS 6.x (32-bit and 64-bit)
CentOS 7.0 (64-bit)
Red Hat Enterprise Linux 4.x (32-bit and 64-bit)
Red Hat Enterprise Linux 5.x (32-bit and 64-bit)
Red Hat Enterprise Linux 6.x (32-bit and 64-bit)
Red Hat Enterprise Linux 7.x (64-bit)
SUSE Linux Enterprise Server 9.x (32-bit and 64-bit)
SUSE Linux Enterprise Server 10.x (32-bit and 64-bit)
SUSE Linux Enterprise Server 11.x (32-bit and 64-bit)
Ubuntu 12.04 (32-bit and 64-bit)
Ubuntu 14.x (32-bit and 64-bit)
CAUTION: During cloning of powered on Linux machines, Converter Standalone 6.0 preserves the following source file systems on the destination: ext2, ext3, ext4, reiserfs, vfat, and xfs. All other source file systems are converted into ext3 or ext4 file systems on the destination virtual machine.
For more information about the operating systems supported by Converter Standalone and other system requirements, see the VMware vCenter Converter Standalone User's Guide.
Prior Releases of Converter Standalone
Features from prior releases of Converter Standalone are described in the release notes for each release. To view release notes for prior releases of Converter Standalone, click one of the following links:
Known Issues
The Converter Standalone 6.0 release contains the following known issues:
Installation
If the name of the Converter Standalone installation directory contains non-ASCII characters, you might experience conversion and configuration problems If the name of the Converter Standalone installation directory contains non-ASCII characters, the following issues might occur:
Conversion and configuration of Windows virtual machines might fail with an error message Unable to reconfigure destination virtual machine. In the vmware-converter-worker.log, this error generates a message similar to Error 3 (error restoring key: Unknown error 3 (0x3) (3)) restoring registry key C:ã—ã™ãŸã•ã‹ãn°...dataSKUNKWORKS_FILLER into... .
If you try to convert a Linux physical machine, you might receive an error message in the Convert Machine wizard Unable to obtain hardware information.
You must restart machines that run 64-bit Windows Vista or later before re-installing Converter Standalone If you uninstall Converter Standalone from a 64-bit Windows Vista, Windows Server 2008, or Windows 7 machine and do not restart it, a subsequent Converter Standalone installation might fail with the following error message: Error 29144. Could not install service Vstor2 MntApi 1.0 Driver (shared). Please reboot and try to install again. Workaround: Restart the Windows Vista, Windows Server 2008, or Windows 7 machine and try installing Converter Standalone again.
Converter Standalone installer removes Workstation 6.5.x remote agents without notification When you use Workstation 6.5.x to hot-clone a Windows source machine, Workstation deploys a remote Workstation agent on the source. If you choose to leave the remote agent on that source and then install Converter Standalone on the same machine, the Converter Standalone installer uninstalls that agent without any warning messages.
Users with limited rights cannot install Converter Standalone on Windows If you are logged in to Windows as a non-administrator user, the following error message is displayed while the InstallShield is extracting files for Converter Standalone installation: Unable to save file: C:WINDOWSInstaller The system cannot find the path specified. The error is displayed because limited users do not have the required write permissions. Workaround: Select the %TEMP% directory to extract the installation files:
Click OK in the error message. A Save As dialog box appears.
Browse to the Temp folder of the current user (for example, C:Documents and Settings'username'Local SettingsTemp) and click OK.
NOTE: You still need to log in as an administrator to install Converter Standalone.
You cannot install vCenter Converter 4.2.1 on the same machine where you have already installed Converter Standalone 6.0 If you install Converter Standalone 6.0 and then install vCenter Converter 4.2.1 server on the same machine, downloading the vCenter Converter 4.2.1 plug-in from vSphere Client fails. Workaround: First install vCenter Converter 4.2.1 and then install Converter Standalone 6.0.
General
Disk-based cloning of a powered off machine image to a virtual datastore destination might fail You might not be able to perform a disk-based cloning of a powered off machine image to a virtual datastore destination. The conversion might fail at 1% with a message Operation expirienced network error if the size of the source disk is not a number that is a multiple of a MB. Workaround: Use volume-based cloning, if the option is available.
Converter Standalone might display an incorrect version of the Windows operating system Converter Standalone might display incorrect operating system information for running machines or virtual machines with Windows 8.1 and Windows Server 2012 R2 and later.
If the operating system is Windows 8.1, Windows 8 is displayed.
If the operating system is Windows Server 2012 R2, Windows Server 2012 is displayed.
Workaround: None. Windows 8.1 and Windows Server 2012 R2 work as expected despite the incorrect operating system displayed.
Creation of virtual machine with thick destination disk type of certain size fails on VSAN datastore even if it seems to have enough space If you try to perform disk-based conversion with thick destination disk type of certain size on VSAN datastore, the creation of virtual machine might fail with the following error 'converter.fault.InsufficientManagedDiskSpace', even if it seems to have enough space. Workaround: Change the destination disk type to thin.
If you try to convert a source physical or virtual machine to a managed destination by using thick provisioned disks with large empty spaces on them, the conversion task might fail If you try to perform a disk-based cloning of a physical or virtual machine to a managed destination by using thick provisioned disks with large empty spaces on them, the conversion task might fail with an error message Unable to clone disk source_disk on the virtual machine virtual_machine_name. The following messages appear in the log file:
(03200 warning 'Default') (,0) (NFC ERROR) NfcNetTcpRead: bRead: -1 (03200 warning 'Default') (,0) (NFC ERROR) NfcNet_Recv: requested 264, recevied only 0 bytes (03200 warning 'Default') (,0) (NFC ERROR) NfcFile_Stream: Failed to get message from source (03200 warning 'Default') (,0) (NFC ERROR) NFC_NETWORK_ERROR
The destination ESX server must return an acknowledgement after each processed NFC write request. If the source sends a large block of zeroes that must be written it might take a long time for the ESX to return the acknowledgement. Thus, the Converter assumes that the operation has timed out and closes the connection, no matter that the ESX server is still writing to the target disk.
Workaround: Change the destination disk type to thin.
When converting hosted virtual machines with unpartitioned disks, you might not be able to obtain hardware information about the source When converting hosted virtual machines with unpartitioned disks, you might not be able to obtain hardware information about the source. In such case, the following error messages might appear in the worker log:
(01628 warning 'Default') Partition:Invalid sector magic number.
(01628 warning 'Default') ERROR: Failure during open: Reading disk signature
(01628 error 'Default') (BaseDiskSetComputer::DoOpen) OpenDisks failed, mntapi error: 32.
Workaround: Remove the unpartitioned disks from the conversion job.
A running P2V conversion job fails if you create a new conversion job for the same Windows source machine and use a different port to deploy the Converter Standalone agent If, while running a P2V conversion job, you start creating another conversion job for the same powered on Windows source machine, and specify a port for the connection, Converter Standalone deploys the Converter Standalone agent using the port you specified. If the connection port is different from the one that is being used for the already running conversion job, both jobs fail. The following error message appears in the Job summary tab for the first conversion job: FAILED: A general system error occurred: No connection could be made because the target machine actively refused it. The following error message appears in the Job summary tab for the second conversion job: FAILED: Unable to create a VSS snapshot of the source volume(s). Error code: 2147754774 (0x80042316).
You cannot copy running conversion or configuration jobs If you open the Copy As New wizard for a running configuration or conversion job when the source is a virtual machine or a backup image and you click Next, the wizard displays the error message Unable to obtain hardware information for the selected machine. Workaround: Wait for the job to complete before selecting Copy as New in its pop-up menu.
Linked Cloning of source images greater than 2GB to a network share that does not support large files fails Creating linked clones from source images that are larger than 2GB to a network share that does not support large files (for example, to a Linux SMB share) fails. Converter Standalone does not split the source files into smaller chunks. If the source is larger than the supported file size on the destination, the conversion tasks fails.
Creating a conversion job to convert a standalone VMware source with a VMDK file greater than 2GB from a network share that does not support large files, fails If you select a standalone virtual machine source with VMDK file greater than 2GB residing on a remote network location that does not support large files (for example, Linux SMB share), the following error message appears in the Converter wizard on clicking Next or View source details: Unable to obtain hardware information for the selected machine. Workaround: Map the network shared folder to the machine where Converter Standalone runs, and select the source from there.
Converter Standalone cannot detect the power state of VMware Workstation or other VMware hosted source virtual machines if they are located on a read-only network share If the source machine is a Workstation or another VMware hosted source and is located on a network share with read-only permissions, Converter Standalone cannot detect if the source is powered on or suspended. This might lead to data inconsistency on the destination machine if changes are made to the powered on source virtual machine during conversion. Workarounds:
Verify that the source virtual machine is powered off prior to conversion.
Provide write privileges to the network share where the source virtual machine resides.
Conversion jobs from and to ESX hosts that are not connected to vCenter Servers fail if the number of disks on the source machine is more than nine When converting a source machine that has more than nine disks, conversion fails with the following error in the log file: Error on logout (ignored): Operation timed out SSLStreamImpl::BIORead (3BBA4E8) timed out. The error is due to the limited number of NFC connections that can be established to ESX hosts that are not connected to vCenter Server instances. Workaround: Connect to the destination ESX host through a vCenter Server. In this case, the number of source disks is limited to 27 for ESX and to 23 for ESXi hosts.
Converting source volumes with unrecognized file systems might prevent the destination virtual machines from starting While you are setting up a volume-based cloning task in one of the Converter Standalone wizards, the volume name might be missing in some rows of the Source Volumes tab. This means that Converter Standalone does not recognize the file system on those volumes. The destination virtual machine that is created as a result of such a conversion task might fail to start up. Nevertheless, Converter Standalone copies the source volume data to the destination using block-level copying. Workaround: configure the destination virtual machine after the conversion.
Converting standalone VMware sources with a VMDK file greater than 2GB to a hosted destination that resides on a network share that does not support large files, fails If you select a standalone virtual machine source with VMDK file greater than 2GB and try to convert it to hosted destination residing on a remote network location that does not support large files (for example, Linux SMB or NFS share), the conversion job might fail with one of following error messages:
Unable to connect to the virtual disk
Remote server closed connection after 0 response bytes read
An error occurred during an operation on a virtual disk
If conversion is successful, the following error message related to the VMDK file might appear when you power on the destination virtual machine: Internal Inconsistency errors Workaround:
In the main application window of Converter Standalone, right-click the failed job and select Copy As New...
Go to the Options page and select Data to Copy.
In the Data to Copy pane, select the volumes to copy and click Advanced.
On the Destination layout tab, select Split not pre-allocated or Split pre-allocated as the destination disk type.
Click Next to view a summary of the conversion job.
On the Ready to Complete page, click Finish to resubmit the job.
Converter Standalone is unable to detect the system volume if it resides on a SCSI disk and IDE disks are present in the source machine On source machines with SCSI and IDE disks, Converter is unable to detect the system volume if the system volume resides on a SCSI disk. Converter only checks the first IDE disk in such configurations.
If the hardware configuration of the source machine is modified while the Conversion wizard is open, you need to restart the conversion wizard if you want to view correct source details Source machine details are retrieved per wizard session, as this is a time-consuming process. If some changes occur on the source machine (such as adding memory or hard drives) after this information is retrieved, the Conversion wizard does not show information about the changes. Workaround: Restart the conversion wizard.
Cloning a source that contains file system errors might result in a damaged virtual machine See Cloning a source that contains file system errors may result in a damaged copy (KB 1006689).
Timeout on SSL handshake when converting over a WAN link Converter Standalone does not support conversion over a WAN. When trying to perform a conversion over a WAN link, you might experience an SSL timeout because the timeout for SSL handshakes is two minutes. Workaround:
To avoid the two-minute handshake, perform a conversion to a hosted destination machine (for example, Workstation) in the same LAN.
Copy the temporary virtual machine and send it over the WAN to the remote site. If the intended destination is a Workstation virtual machine, this completes the process.
If the intended destination is ESX, import the Workstation virtual machine to the ESX server.
User Account Control (UAC) prevents installing Converter Standalone agent if you are not using the default Administrator account to connect to a powered on source machine If you are setting up a task to convert a powered on source machine that runs Windows Server 2008, Windows Vista, Windows 7, Windows Server 2012, or Windows 8 and you use a non-default Administrator account to log in to the source machine, the following error message might appear when you try to install Converter Standalone agent on the source machine: Insufficient permissions to connect to xxxxxxx. Here xxxxxxx is the IP address of the source machine. This is because Converter Standalone server cannot install Converter Standalone agent when UAC is enabled and you are logged in to the source as non-default Administrator user. Workaround: Disable the UAC on the source machine before you start the Conversion wizard. You can search the Microsoft Web site for procedures on disabling the UAC depending on the source operating system. For Windows Server 2012 and Windows 8, in addition to disabling UAC, you must perform the following steps:
In the Windows Start menu, type gpedit.msc. The Local Group Policy Editor opens.
Navigate to Computer Configuration > Windows Settings > Security Settings > Local Policies > Security Options.
Disable the Run all administrators in Admin Approval Mode setting.
Restart.
The Reconfigure Virtual Machine wizard does not display correctly the vDS port group name When you reconfigure a virtual machine that uses dvSwitch and you navigate to the Network interface settings pane, the Network name text box does not display the name of the dvSwitch after the port group name. Only port group is displayed instead.
The reported network transfer rate might not be correct The reported network transfer rate might be higher than the actual one because of the inherent compression used by the network protocol. This does not affect the network throttling.
Adding a virtual machine to a domain might fail if you specify a fully qualified user name When configuring a virtual machine, you might not be able to add the virtual machine to a domain if you use a fully qualified user name (DOMAIN_NAMEUSER_NAME). Workaround: Specify the user name without including the domain name.
Conversion of a physical machine running Microsoft Windows XP or Windows Server 2003 with a BCD manager (Boot Manager for Windows Vista) and later might fail If you try to convert a physical machine with a BCD manager, the P2V conversion might fail in the following cases:
Microsoft Windows Vista or later is installed on the source physical machine, which is a dual-boot machine currently running Microsoft Windows XP or Windows Server 2003.
Microsoft Windows Vista or later is installed as a second operating system on the source physical machine and later is removed, but the BCD manager is left on the source machine.
Workaround 1: In case of a dual-boot machine conversion :
Boot the later version of Windows (Windows Vista, Windows Server 2008, or Windows 7).
Perform a physical source conversion.
On the newly created virtual machine, boot a repair CD for the earlier version of Windows (Windows XP or Windows Server 2003).
Remove the BCD manager and revert the operating system to its compatible boot process.
Shut down the virtual machine and reconfigure it by using the Converter Standalone configuration wizard. Now you can boot the machine.
Workaround 2: In case of converting a source machine running Windows XP or Windows Server 2003 with a BCD manager:
On the source machine, boot a repair CD of the corresponding operating system.
Remove the BCD manager and revert the operating system to its compatible boot process.
For more information on how to repair BCD, see the Microsoft knowledge base article Windows no longer starts after you install an earlier version of the Windows operating system in a dual-boot configuration. Submitting a job might fail with The specified parameter was not correct:'info.owner'message If Converter Standalone is installed in a client-server mode and you have connected by using a username, which is the same as the computer name, submitting a job might fail with The specified parameter was not correct:'info.owner' message. Workaround: Connect by using a different user account with administrative rights. You might not be able to convert more than nine disks at once On ESX 3.5 and 4.0, conversion might fail if you try to convert more than nine disks. Workaround: Perform conversion in multiple steps to convert the disks in portions of up to nine. Then, attach all the disks to the target machine.
Windows Sources
If you convert a source machine with Windows 2008 and above operating system, some disk(s) may be offline or read-only If you convert a source machine with Windows 2008 and above operating system, some disk(s) in the destination VM may be offline or read-only. Workaround:
If the disk is offline, in the Disk Management console diskmgmt.msc, right-click the disk and select Online.
If the disk is read-only, run diskpart.exe with administrator's rights, and then run the following commands:
DISKPART> list disk Lists all disks and their status: online/offline.
DISKPART> select disk # Where '#' is the number of disk in offline state.
DISKPART> attribute disk clear readonly
DISKPART> online disk
Repeat steps 2-4 for every offline disk.
DISKPART> exit
Configuration of Windows virtual machines with multiple active partitions might not complete For Windows virtual machines with multiple active partitions, Converter Standalone might not recognize the boot partition and might not be able to complete the reconfiguration of the destination virtual machine. In such cases, after the conversion job is 96-98% complete, the conversion job status changes to Failed and an error message appears. For example: FAILED: Unable to find the system volume, reconfiguration is not possible. In the Worker/Agent log this issue is identified by the following statement: (#### warning 'Default') ERROR: (Mntapi_GetFirstBootDisk) more that *one* active volume found. Current active disk #0, another active disk #1. Workaround 1: Mark all non-boot active partitions on the destination machine as inactive and run configuration on the destination machine.
Boot into Windows Recovery Console on the destination machine.
Run diskpart.exe. The diskpart command prompt appears.
(Optional) To list the available disks, enter list disk.
Enter select disk <disk_number>.
(Optional) To list the partitions on the selected disk, enter list partition.
Enter select partition <partition_number>.
Enter inactive.
Repeat steps 4-7 to mark another partition as inactive.
Power off the destination machine.
Run Converter Standalone and configure the destination machine.
Workaround 2: Mark all non-boot active partitions on the source machine as inactive and attempt to run the conversion again.
On the source machine, run diskpart.exe. The diskpart command prompt appears.
(Optional) To list the available disks, enter list disk.
Enter select disk <disk_number>.
(Optional) To list the partitions on the selected disk, enter list partition.
Enter select partition <partition_number>.
Enter inactive.
Repeat steps 2-6 to mark another partition as inactive.
Run Converter Standalone and start the conversion again.
Conversion of a local powered on source machine fails at 1% If you select This local machine as a conversion source and a Converter Standalone agent from a previous Converter Standalone version is installed on the source machine, the conversion task fails at 1%. The following error message appears in the Status line of the Task progress tab: FAILED: Unable to create a VSS snapshot of the source volume(s). Error code: 127 (0x0000007F). This is because the Converter Standalone installer cannot upgrade previous versions of Converter Standalone agents. Workaround: Manually uninstall Converter Standalone agent from the source machine and create a new conversion task.
Converter Standalone worker process stops responding if you try to copy a configuration job during guest operating system customization If you right-click a running configuration job and select Copy As New while the destination machine is being customized, Converter Standalone worker process stops responding. Workaround: Wait for the configuration job to complete before you copy it.
Subsequent P2V conversions of remote source machines that run 64-bit Windows Vista or later might fail after a successful conversion If you convert successfully a remote source machine that runs 64-bit Windows Vista, Windows Server 2008, or Windows 7 operating system and then try converting it again, the conversion fails with the error message Converter Standalone Agent installation failed on x.x.x.x Error code: 1603, where x.x.x.x is the IP address of the source machine. This error message might occur if automatic uninstall of remote Converter Standalone agent has been enabled during the first successful conversion. Workaround: Restart the remote source machine and try running the conversion task again.
Converter Standalone does not preserve disabled network adapters during conversion of physical machine sources that run on Windows During P2V conversion of Windows source machines, Converter Standalone does not detect disabled network adapters on the source and does not preserve them on the destination virtual machine. Workaround: On the Options page of the Converter Standalone wizard, click Networks to add network adapters to the destination virtual machine.
Microsoft Windows Vista reboots repeatedly after customization Providing wrong customization information might cause the destination virtual machine to reboot repeatedly if the source operating system is Microsoft Windows Vista. During conversion or configuration, if you choose to customize Microsoft Windows Vista and provide wrong customization information, for example an invalid serial key, the customized destination reboots repeatedly. This is a known issue with Microsoft Windows Vista. Workaround: Make sure that the provided customization information is valid.
Converter Standalone does not support cloning powered on Windows Server 2008 sources with FAT/FAT32 volume file system VSS under Windows Server 2008 does not support FAT/FAT32. Trying to convert a FAT/FAT32 volume causes the conversion task to fail. Workaround: Deselect all FAT/FAT32 volumes on the Options page of the Conversion wizard.
Converter Standalone remote agent does not notify the user about Converter 3.0.x or 4.0.x remote agents that have been installed on the source system during remote hot cloning process If Converter Standalone is converting a remote machine source that already has a remote agent from Converter version 3.0.x or 4.0.x, it uninstalls the old remote agent without issuing a notification or warning message. This prevents older Converter versions from converting this source machine later.
Previous Converter versions cannot convert source machines that have Converter Standalone 6.0 agent installed on them Converter Standalone 6.0 agent is deployed on the source machine during conversion. If Converter Standalone 6.0 agent is not uninstalled after the conversion, older Converter versions cannot deploy their agents on top of the newer Converter Standalone agent version. Therefore, you cannot use previous Converter versions to convert sources that have already been converted with Converter Standalone 6.0. Workaround: Uninstall Converter Standalone 6.0 agent before trying to convert the source with an older Converter version.
Stopping Converter Standalone processes during file-level cloning might cause the machine that runs the Converter Standalone server service to restart During file-level cloning of source systems that run Windows XP or Windows Server 2003, if any of the following Converter Standalone process is forcibly stopped, the machine on which the stopped process was running might automatically reboot.
VMware Converter Standalone Integrated Worker
VMware Converter Standalone Integrated Agent
This behavior is not consistent and depends on the Windows version and patch level.
Workaround: Do not stop any Converter Standalone services on the source machine during file-level cloning. For more information and hot fix, check the Microsoft site Error message when a Delayed Write Failure event is reported in Windows Server 2003: 'Stop 0x00000019 - BAD_POOL_HEADER' or 'Stop 0xCD PAGE_FAULT_BEYOND_END_OF_ALLOCATION'.
Converter Standalone does not change PIC HAL to APIC HAL during conversion of Windows source machines If the source to convert is running a Programmable Interrupt Controller (PIC) HAL, Converter Standalone does not change the PIC HAL to an Advanced Programmable Interrupt Controller (APIC) HAL in the destination virtual machine. As a result, the destination virtual machine might not boot or might fail to perform as expected. To find out which HAL is running, go to Windows Device Manager and select Computer in the list of devices. If it displays Standard PC or Advanced Configuration and Power Interface (ACPI) PC, you are running a PIC HAL. Workaround: VMware virtual machines are APIC computers. If your source computer is a PIC computer that runs a PIC HAL, you must update the HAL in the destination virtual machine to APIC HAL after the conversion. For more information on configuring the correct HAL, check the Microsoft Web site HAL options after Windows XP or Windows Server 2003 Setup. Note: Microsoft does not support running a PIC HAL on an APIC computer. If your source is an APIC computer running a PIC HAL, you must configure the correct HAL on the source machine before starting the conversion.
Owner name and organization are not displayed properly after customizing the guest operating system After customizing the guest operating system, Unicode characters used for owner name and organization on the Computer Information page do not appear the way they were set in the Conversion or the Configuration wizard. For all Windows operating systems except Windows Vista, customization parameters such as user name and organization must use characters only from the local encoding of the default user profile of the guest. For example, you can use Japanese characters for the user name only on a guest whose default user profile's local encoding is set to Japanese. These restrictions do not apply to Windows Vista guests because Windows Vista uses a UTF-8 encoded XML file to store the Microsoft sysprep parameters. Earlier versions of Windows use the sysprep.inf file, and the Microsoft Windows mini-setup process reads that file in the local encoding only. Workaround: Either avoid Unicode characters when assigning owner name and organization name for the destination virtual machine, or use the workaround described at: http://support.microsoft.com/kb/310441/.
Converter can convert FAT/FAT32 volumes during hot cloning only if the source machine has at least one NTFS volume For source machines running under Windows versions earlier than Windows Server 2008, VSS can take snapshots of FAT/FAT32 volumes only if the source machine has at least one NTFS volume. For all operating systems that support volume-based cloning, you need at least one NTFS volume for VSS to work.
Converter Standalone agent does not start automatically after reboot If the source machine starts up too slowly, Converter Standalone agent might not start automatically after the source machine is restarted. Workaround: Start the Converter Standalone agent manually:
Right-click My Computer and select Manage.
In the Computer Management window, select Services and Applications >Services on the left.
In the list on the right, double-click VMware Converter Standalone Agent.
Click Start to start the process.
Click Apply followed by OK.
The source virtual machine does not have the appropriate drivers The following error message appears in the log file when reconfiguration fails because the appropriate drivers are missing from the source operating system: Unable to find symmpi.sys in the specified CAB files This is usually observed in Windows Server 2003 SP1. Workaround:
Back up the virtual machine created during the failed conversion.
Attach the VMDK file containing the system folder to another Windows Server 2003 virtual machine.
Replace the WINDOWSDriver Cachei386driver.cab file in the destination virtual machine with a version of the driver.cab file that includes the missing driver from the helper virtual machine.
Detach the VMDK file from the helper virtual machine and run the Configure Machine wizard on the destination virtual machine.
Sysprep deletes drive letter mappings during customization If you choose customization options and the destination virtual machine fails at a Please Wait screen after the second sysprep reboot, you need to rerun the conversion task without customization. This issue occurs because of a problem with Microsoft sysprep, which deletes the drive letter mappings, preventing access to certain files.
You cannot import a Windows source with 'signature()' in the boot.ini file You cannot import a Window source with 'signature()' in the boot.ini file. If you import a Windows live source with 'signature()' in the boot.ini file, and try to reconfigure and convert it, the reconfiguration fails and this results in a conversion error. If you try to convert the source without reconfiguration, the conversion succeeds but the destination cannot boot. For more information on 'signature()' go to http://support.microsoft.com/kb/227704.
Linux Sources
Converted SUSE Linux Enterprise Server 10 machine might not have network connectivity If you convert a SUSE Linux Enterprise Server 10 machine, the converted virtual machine might not have network connectivity.
Workaround:
In the /etc/udev/rules.d/30-net_persistent_names.rules.d/30-net_persistent_names.rules file, comment out the lines that start with SUBSYSTEM and contain the old MAC addresses.
Check the /etc/sysconfig/network directory. If there is no ifcfg-eth0 file and there is a file of the form ifcfg-if-mac_address, rename it to ifcfg-eth0.
Restart the network service.
Converted powered on Linux machines cannot start up If you convert a powered on Linux machine that has a non-standard LVM filter saved in the /etc/lvm.conf file, the converted virtual machine might fail to start up. The following error message appears in the virtual machine console: Unable to access resume device (dev//) Workaround: Before the conversion, edit the filter in the lvm.conf file on the source Linux machine to allow all devices. For Red Hat Linux, the default value of the filter is ( 'a/.*/' ).
Linux P2V conversion fails in the beginning with the following error message: 'A general system error occured: <source_server_dns_name>: Connection closed by remote host' If the source machine sshd is configured to allow less than 3 unauthenticated connections, it may sever the converter connection. Workaround: Check MaxStartups in /etc/ssh/sshd_config and ensure it is either commented out or its first number is 3 or higher.
P2V conversions of SLES 9 sources cannot complete, if the root directory is located on an LVM disk When you select to convert a physical SLES 9 source, Converter Standalone cannot complete the conversion if the root directory is located on an LVM disk. After the conversion job is 99% complete, the job status changes to Failed and the following entry is added to the log: FAILED: An error occurred during the conversion: 'Failed to restore original lvm in initrd image: /usr/lib/vmware-converter/restoreLvmInInitrd.sh failed with return code: 1, and message: * Unpacking initrd image /mnt/p2v-src-root//boot/initrd cpio: unsupported cpio format, use newc or crc ERROR: Unable to unpack initrd image /mnt/p2v-src-root//boot/initrd ' Workaround: Convert the LVM disk to a basic disk.
On the Options page of the Conversion wizard, click Data to copy in the options list.
Click Advanced and select the Destination layout tab.
Select the volume that contains the root directory and click To basic.
Virtual machines cloned from SLES 11 SP1 sources to ESX/ESXi managed destinations boot in console mode After the conversion, the destination virtual machine cannot load the GNOME Display Manager and boots in console mode. The following warning message appears: GdmLocalIDisplayFactory: maximum number of X display failures reached: check X server log for errors. Workaround: Recreate the xorg.conf file.
X Server might fail to start in destination virtual machines converted from sources that run Linux When the destination virtual machine starts, X server might fail to start with an error Fatal X server Error. This is due to incompatibility issues between the display driver used in the Linux source and the display adapter of the destination VMware virtual machine. Workarounds:
Install VMware Tools on the destination virtual machine.
configure the X server on the destination virtual machine to change the refresh rate and the display resolution.
Linked cloning of standalone VMware sources to Linux SMB shared destination fails Linked cloning tasks of VMware standalone sources to SMB shared destinations that run on Linux fail with the following error: converter.fault.FileIOFault.
The number of LVM logical volumes per volume group is limited to 12 for powered on Linux sources During the conversion of powered on Linux machines, Converter Standalone converts LVM volume groups into new disks on the destination virtual machine. The number of LVM logical volumes on a source LVM volume group cannot exceed 12. Workaround: Move volumes out of the new disk to other destination disks:
On the Options page of the Conversion wizard, click Data to copy.
From the Data copy type drop-down menu, select Select Volumes to copy and click Advanced.
On the Destination layout tab, select a volume to move and click Move Up or Move Down until it is moved to the destination disk. You can move volumes between disks only if they are not Active /boot or System / volumes.
(Optional) To create a new destination disk, click Add Disk.
By default, the Linux P2V helper virtual machine is powered off when the conversion job finishes Workaround: Manually disable this option in the converter-worker.xml file.
On the machine where Converter Standalone server runs, browse to the converter-worker.xml file in the following location %ALLUSERSPROFILE%Application DataVMwareVMware Converter Standalone.
Open the converter-worker.xml file in a text editor and change the powerOffHelperVm flag from true to false.
To restart Converter Standalone worker: Reboot the system or open the Services section in the Microsoft Management Console, find the VMware Converter Worker service and restart it.
Note: Care should be taken when this option is enabled and the helper VM network is configured to use a static IP address. After the conversion, the helper VM retains the statically configured IP because it is still running. Thus any subsequent Linux P2V jobs cannot use the same static IP until this helper VM is powered off, or at least has its network interface disabled. Disabling the powerOffHelperVm flag is useful when the useSourcePasswordInHelperVm Converter Standalone worker flag is enabled. This allows users to log in to the helper virtual machine after conversion.
Source volumes on top of volume managers other than LVM are not recognized during conversion of powered on Linux machines Converter Standalone recognizes only managed source volumes that run on the LVM volume manager. Other volume managers, including but not limited to Veritas Volume Manager (VxVM), are not recognized.
Converter Standalone does not recognize source volumes that reside on Linux Software RAID configurations During cloning of powered on Linux machines, Converter Standalone does not recognize source volumes that are part of a Software RAID configuration (also referred to as multiple disk, or MD, configurations).
By default, Converter Standalone has a 20 minute timeout when waiting for the helper virtual machine to start up during Linux P2V conversion This might cause a Linux P2V conversion task to fail due to connection timeout. Workaround: Extend the timeout period (in milliseconds) by modifying the linuxP2VBootTimeout flag in the converter-worker.xml file.
On the machine where Converter Standalone server runs, browse to the converter-worker.xml file in the following location %ALLUSERSPROFILE%Application DataVMwareVMware Converter Standalone.
Open the converter-worker.xml file in a text editor and replace the default value for linuxP2VBootTimeout with the necessary timeout value in milliseconds. Note: The timeout value is measured in milliseconds. To specify the timeout in minutes, multiply the number of minutes by 60000 and use that value.
To restart Converter Standalone worker: Reboot the system or open the Services section in the Microsoft Management Console, find the VMware Converter Worker service and restart it.
Sparse files are not preserved during conversion of powered on source machines that run Linux By default, Converter Standalone does not preserve sparse files on the source machine during Linux P2V conversion. If you have large sparse files on the source, they are created as non-sparse on the destination virtual machine. This renders the used space on the destination file system larger than that on the source machine. This might also cause the conversion task to fail with a timeout error. Workaround: Manually enable preserving sparse files during Linux conversions by modifying the keepsake flag in the converter-worker.xml file.
On the machine where Converter Standalone server runs, browse to the converter-worker.xml file in the following location %ALLUSERSPROFILE%Application DataVMwareVMware Converter Standalone.
Open the converter-worker.xml file in a text editor and change the keepsake flag from false to true.
To restart Converter Standalone worker: Reboot the system or open the Services section in the Microsoft Management Console, find the VMware Converter Worker service and restart it.
Destination virtual machine might not boot if you change the disk controller type while converting a Linux virtual machine In Linux virtual machines, the root device can be defined using the block device name (such as /dev/sda1) in /boot/grub/grub.conf, /boot/grub/menu.lst, or /etc/fstab. If you change the disk controller type while converting the virtual machine, the destination virtual machine might not boot. This is because the root device now has a different name (for example, it might have been changed to /dev/hda1). Workaround: Configure the destination virtual machine manually. At the minimum, change the root device name to reflect its new name in the destination virtual machine. To make your system more robust, use the volume label or UUID instead of the block device name.
During conversion of powered on Linux machines, Converter Standalone does not recognize Linux source volumes if they are mapped directly on a hard disk Workaround: Linux source volumes that are not managed by LVM must be located in a partition so that Converter Standalone can recognize them during cloning of powered on Linux sources.
Linux P2V jobs on ESX 5.0 target hosts fail if the name of the virtual machine is not in ASCII symbols or in the Windows current system locale If the target host is ESX 5.0, the name of the virtual machine must be in ASCII or in the Windows current system locale, otherwise the helper machine cannot be connected and the Linux P2V conversion fails. Workaround: Before the conversion, enter the name of the virtual machine by using ASCII symbols. After the conversion is complete, you can rename the virtual machine.
Third-Party Formats
Virtual machines created from Acronis images that have dynamic volumes do not start up after the conversion Some Acronis True Image images of Windows Vista, Windows Server 2008, or Windows 7 are not correctly configured and do not start up after the conversion. The problem occurs when the system or the active disk is located on a dynamic volume in the source. Workaround:
Create a new virtual machine using the vSphere Client.
Use the Acronis True Image software to restore the image inside the new virtual machine.
Limitations when converting third-party images You can use Converter Standalone to convert third-party virtual machines, system images, and backup images with the following limitations:
Backups of systems with dynamic disks are not supported (ShadowProtect and Backup Exec System Recovery).
All images for the backup of a machine must be in a single folder that contains no other images (ShadowProtect and Backup Exec System Recovery).
For incremental images, up to 16 incremental backups are supported (ShadowProtect and Backup Exec System Recovery).
Images of systems with logical volumes are not supported if the logical drive is also a system or active volume (only for ShadowProtect sources).
For volume-based cloning of Acronis and StorageCraft, all volumes in the disk before the active and system volumes must be backed up. For example, if a disk has 4 partitions, 1-4, with partition 2 as the active volume and partition 3 as the system volume, the backup must include volumes 1 through 3 (ShadowProtect and Backup Exec System Recovery).
Virtual machines from Macintosh versions of Virtual PC are not supported.
Older versions of VMware products have limited support of newer operating systems. For example, ESX 3.5 does not support Windows 7. The converted source operating system must be supported for the destination VMware platform. For a list of supported systems, see the Guest Operating System Installation Guide.
Separate backup images should be stored in separate folders Storing more than one third-party backup in a single folder results in a failed migration. Workaround: Place each backup in its own folder before using Converter Standalone to convert an image.
SDK Release Notes
Converter Standalone SDK 6.0
The VMware vCenter Converter Standalone API provides language-neutral interfaces to the Converter Standalone server management framework. The Converter Standalone SDK is a ZIP file that contains the following items.
Sample code demonstrating common use cases for programmatically managing Converter Standalone server. The sample code includes Java and C# source code files. See the respective Readme files (readme_java.htm and readme_dotnet.htm ) for information about building and using the samples.
The WSDL that defines the API available on Converter server.
Batch files and shell scripts to automate the process of generating client-side stubs, and for rebuilding the sample applications. For C# developers, the Microsoft Visual Studio project files (.sln) have been included.
Reference documentation, the VMware vCenter Converter Standalone API Reference Guide, which provides language-neutral descriptive information (object type definitions, properties, and method signatures, for example) for the VMware vCenter Converter Standalone API 6.0.
Obtaining the Software
You can obtain the Converter Standalone SDK 6.0 from here.
Supported Platforms
The Converter Standalone 6.0 SDK is tested only on the supported Windows platforms. See Platforms.
0 notes
Text
300+ TOP VMWARE Objective Questions and Answers
VMWARE Multiple Choice Questions :-
1.Which of the following dvPort binding types have been removed in vSphere 5? A. Dynamic Binding B. Ephemeral Binding C. Static Binding Ans: A 2.Your boss has asked you to setup 4 ESXi hosts to evaluate the new vSphere 5 release, which is the recommended install method to use in this situation? A. Interactive Installation B. Scripted Installation C. vSphere Auto Deploy Installation D. Upgrade via VMware Update Manager Ans: A 3.Your colleague has accidentally allocated more vRAM than your company are licensed for. What will happen to your virtual machines? A. All VM's will be Powered Off B. New VM's can not be Powered On C. VMware will be notified D. Nothing will happen Ans: B 4.In an HA cluster after an initial election process, host are either: A. Primary or Secondary B. Master or Slave C. King or Queen D. Live or Standby Ans: B 5.To get the maximum performance benefits of vNUMA it is recommended to: A. Make sure your clusters are composed entirely of hosts with matching NUMA architecture. B. Only use single vCPU virtual machines C. Enable EVC on your clusters D. Disable Hyper-Threading Ans: A 6.What is the name of the globally unique identifier assigned to each Fibre Channel Port? A. IP Address B. MAC Address (Mac) C. World Wide Name (WWN) D. Port_ID Ans: C 7.It is possible to Storage vMotion virtual machines that have snapshots? A. True B. False Ans: A 8.What are the 4 VM Restart Priority options available on an HA Cluster? A. Disabled, Low, Medium, High B. Enabled, Small, Medium, Large C. 1st, 2nd, 3rd, 4th D. Priority, 2nd Tier, 3rd Tier, Best Effort Ans: A 9.A memory reservation defines: A. the amount of virtual machine memory that can be paged to the VMkernel swapfile B. the amount of physical memory that is guaranteed to the VM C. the maximum amount of physical memory that will be used by a VM D. the amount of host memory reserved for the VMkernel Ans: D 10.Which of the following installation methods installs the ESXi image directly into the Host memory? A. Interactive ESXi Installation B. Scripted ESXi Installation C. vSphere Auto Deploy ESXi Installation Option D. Upgrade via VMware Update Manager Ans: D

VMWARE MCQs 11.VMFS-5 upgraded from VMFS-3 continues to use the previous file block size which may be larger than the unified 1MB file block size. A. True B. False Ans: A 12.Which of the following formulas defines the amount of virtual machine memory that will always be composed of disk pages? A. Memory allocated -(minus) memory limit B. Memory limit -(minus) memory reservation C. Memory limit -(minus) memory available D. Memory allocated -(minus) memory available Ans: D 13.The upgrade procedure from VMFS-3 to VMFS-5 will require downtime of that datastore? A. False B. True Ans: A 14.Which of the following actions would be LEAST likely to reduce resource contention? A. Powering off a VM B. Enabling Swap-To-Cache C. Disable transparent memory page sharing D. Enabling vNUMA Ans: C 15.When is vNUMA enable by default on a virtual machines? A. When a virtual machine has more than 8 vCPU's B. When the guestOS is configured using an SMP HAL C. All the time D. vNUMA is never enabled by default Ans: A 16.Which new feature of vSphere 5 is used to collect host core dumps? A. vMA 5.0 B. ESXi Dump Collector C. ESXi Syslog Collector D. VMware vDR 2.0 Ans: B 17.After an upgrade from ESX4.X to ESXi5.0 you notice that when you run the following command via the vMA: "esxcfg-vswif -l" you notice that their are no configure vswif interfaces listed. Why would this be? A. The Service Console is no longer available with vSphere 5. All vswif interfaces are removed during the upgrade. B. During the upgrade process all vswif interfaces are migrated to vmk interfaces. C. During the upgrade process, vswif interfaces are disable by default, they'll need to be enable before they will be listed. D. The wrong command is being used. "vicfg-vswif -l" is the correct command to display all vswif interfaces. Ans: B 18.How has vMotion been improved in vSphere 5? A. Multiple vMotion vmknics, allowing for more and faster vMotion operations B. Long distance vMotion, allowing for vMotions over a large geographical area C. Multi-platform vMotion, allowing for vMotions between vSphere and Hyper-V platforms D. Storage vMotion, allowing for virtual machines storage to be moved between datastores Ans: D 19.What are the Automation Levels on a DRS Cluster? A. Manual, Partially Automatic, Fully Automatic B. Manual, Partially Automated, Fully Automated C. Manual, Semi Automated, Fully Automatic D. Manual, Semi Automatic, Automatic Ans: D 20.What are the two iSCSI discovery methods that are supported by an ESXi host? A. Static Targets, Dynamic Targets B. Static Discovery, SendTargets C. Static Discovery, FindTargets D. Dynamic Discovery, FindTargets Ans: A 21.After an upgrade from ESX4.X to ESXi5.0 you notice that your Port Group named "Service Console" is missing. Where has it gone? A. Because ESXi 5.0 has no Service Console, upgrading from ESX 4.x to ESXi 5.0 removes the Service Console port group. B. During the upgrade all Port Groups are removed. The Service Console Port Group will need to be recreated. C. During the upgrade all Port Groups are moved to Distributed Switches. D. During the upgrade all Port Groups are moved to Standard Switches. Ans: A 22.You have been asked to provide high availability for your vCenter server. Which product would you use to help achieve this? A. Fault-Tolerance B. vCenter Linked-Mode C. vCenter Heartbeat D. Microsoft Clustering Services Ans: C 23.VMware vSphere can be evaluated prior to purchase. What is the maximum number of days the evaluation can be used before a license must be purchased? A. 30 Days B. 60 Days C. 90 Days D. 120 Days Ans: B 24.Which feature of vSphere 5 can be used to increase network throughput to virtual machines? A. SplitRX B. NPIV C. VMDirectpath I/O D. RDM Ans: A 25.Which feature of vSphere 5 can be used to reduce virtual machine memory overhead? A. VMX Swap B. SplitRX C. Swap to Host D. Memory Reservations Ans: A VMWARE Objective type Questions with Answers 26.By default, where do hosts deployed with VMware Auto Deploy store logs? A. In Memory B. First mounted LUN C. Local disk D. vMA Ans: A 27.Which new feature of vSphere 5 is used to create ESXi installation images with a customized set of updates, patches, and drivers? A. Image Builder B. Host Profiles C. Auto Deploy D. Esxcli Ans: D 28.Which of the following is not a new feature made available with vSphere 5? A. sDRS B. vDR C. VSA D. vSphere Web Client Ans: B 29.What protocol is used by an ESXi host to communicate with NAS devices? A. NFS B. iSCSI C. CIFS D. SMB Ans: B 30.After an upgrade from ESX/ESXi 4.1 to ESXi 5.0, your monitoring department are reporting that they have stopped receiving Syslog data from all of the ESXi hosts. What could be the problem? A. Custom ports that were opened by using the ESX/ESXi 4.1 esxcfg-firewall command do not remain open after the upgrade to ESXi 5.0. B. Custom ports that were opened by using the ESX/ESXi 4.1 esxcfg-firewall command do not do not get copied during the upgrade to ESXi 5.0. C. Tech Support Mode is disable by default after an upgrade to ESXi 5.0 stopping all traffic on all ports D. ESXi 5.0 cannot send logs to Syslog servers. Ans: D 31.The default security policy on a Port Group is: A. Reject, Accept, Accept B. Reject, Reject, Reject C. Accept, Accept, Accept D. Reject, Reject, Accept Ans: A 32.When deploying hosts with VMware Auto Deploy, which is the recommended method to configure ESXi once it has been installed? A. Host Profiles B. PowerCLI C. Manually D. via Direct Console Ans: A 33.What is an HA Slot? A. A slot is a logical representation of the memory and CPU resources that satisfy the requirements for any powered-on virtual machine in the cluster. B. A slot is a given to each Host in an HA Cluster, there is a maximum of 32 in an HA Cluster C. A slot is given to each Virtual Machine, this determines the restart priority. D. A slot has nothing to do with HA, it's how DRS calculates which Virtual Machine should be placed where. Ans: A 34.Which new version of VMFS is introduced by vSphere 5? A. VMFS-2 B. VMFS-3 C. VMFS-5 D. VMFS-4 Ans: C 35.ESXi 5.0 supports only LAHF and SAHF CPU instructions? A. True B. False Ans: A 36.Which of the following is no longer available with vSphere 5? A. ESX B. vCenter C. vSphere Client D. PowerCLI Ans: D 37.Which if the following is not a supported location for a host diagnostic partition? A. Shared local storage B. Private local storage C. Private SAN storage D. Shared SAN storage Ans: A 38.Which of the following actions is not available via the Direct Console? A. Shutdown host B. Enter host into Maintenance Mode C. View host logs D. Configure host DNS Ans: B 39.Which vSphere feature provides dynamic allocation of storage capacity? A. vStorage APIs / VCB B. Thinapp C. sDRS D. vStorage Thin Provisioning Ans: C 40.To improve security which new feature has been added to ESXi? A. Firewall B. Local Mode C. Anti-Virus D. vShield Ans: A 41.What the packaging format used by the VMware ESXi Image Builder? A. .rar B. .zip C. .iso D. VIB Ans: C 42.What are the three default roles provided on an ESXi host? A. No Access, Read Only and Administrator B. Read only, Operator Access and Administrator C. Virtual Machine User, Virtual Machine Power User and Administrator D. Network Consumer, Datastore Consumer and Resource Pool Administrator Ans: A 43.Which of the following is a requirement for vCenter? A. A Static IP address B. A DHCP IP address C. A valid (internal) domain name system (DNS) registration. Ans: C 44.Which two users are assigned the Administrator role at the ESX Server level by default? A. root, administrator B. root, vpxuser C. root, vpxa D. root, hostd Ans: B 45.After an upgrade from ESXi4.0 to ESXi5.0 you are unable to putty to your hosts. What could have caused this? A. SSH configuration is not migrated for ESX 4.x hosts or ESXi 4.0 hosts. For these hosts, SSH access is disabled during the upgrade or migration process B. SSH is not available with ESXi 5.0, it is only available with ESX 5.0. C. SSH is always disabled after an upgrade or clean installation. D. The SSH port in ESXi 5.0 has changed to 443 for added security. Ans: A 46.What are the three Host Isolation Response options available on an HA Cluster? A. Shut down, Power off, Leave powered on B. Shut down, Power off, Leave powered off C. Shut down, Restart, Leave powered on D. Shut down, Restart, power on Ans: B 47.You boss has asked you deploy 40 ESXi hosts as quickly as possible, which is the recommended install method to use in this situation? A. Interactive Installation B. Scripted Installation C. VMware Auto Deploy Installation D. Upgrade via VMware Update Manager Ans: D 48.Distributed Power Management (DPM) requires which technology to be available on the NIC? A. Wake On LAN (WOL) B. DNS C. BMC D. NetBIOS Ans: A 49.The organisation you work for is currently running vSphere 4.1 U1. Your team have just created a new Test/Dev environment based on vSphere 5. The VM management team have asked if you could combine the current 4.1 U1 environment and 5.0 vCenters with Linked-Mode. What is the correct response to the VM management team? A. vCenter 4.1 and vCenter cannot be joined with Linked-Mode B. Additional licensing is required to use Linked-Mode C. Only vCenter Administrators can use Linked-Mode D. No problem Ans: D 50.Which of the following is not a benefit of VMware Auto Deploy? A. Decouples the VMware ESXi host from the physical server and eliminates the boot disk B. Eliminates configuration drift C. Simplifies patching and updating D. Accelerates deployment of virtual machi VMWARE Questions and Answers pdf Download Read the full article
0 notes
Text
New Post has been published on
New Post has been published on https://www.tayfundeger.com/fault-tolerance-network-konfigurasyonu.html
Fault Tolerance Network Konfigurasyonu
Merhaba,
Fault Tolerance Network Konfigurasyonu isimli bu yazımda sizlere Fault Tolerance özelliğini kullanmadan önce yapmanız gereken işlemlerden birtanesi olan network ayarlarından bahsedeceğim. Ben daha önce Fault Tolerance ile ilgili bir çok makale yazmıştım. Bu yazılarıma aşağıdaki linkten ulaşabilirsiniz.
Fault Tolerance Nedir?
vSphere 6.7 – Fault Tolerance Yenilikleri
vSphere 6.5 – Fault Tolerance Yenilikleri
Fault Tolerance kullanmak istiyorsanız bunun öncesinde Fault Tolerance ‘in network ayarlarını yapmanız gerekiyor. Çünkü Fault Tolerance’in aktif edildiği virtual machine üzerinden CPU ve Memory dataları sürekli farklı bir host’a replike edileceği için ayrı bir network kullanılması tavsiye ediliyor.
Fault Tolerance’ın kullanacağı network’u isterseniz Management veya vMotion ile aynı uplink üzerinde tutabilirsiniz. İsterseniz FT için farklı bir uplink’de kullanabilirsiniz. VMware FT network’une özel bir uplink kullanmanızı öneriyor. Yani management veya vMotion ile aynı uplink’i kullanmamalı. Daha önce yazmış olduğum makalelerde de bahsetmiştim. Gigabit network kullanabilirsiniz ancak en iyi performans için her zaman 10gigabit network kullanmanız tavsiye ediliyor.
Fault Toelerance kullanabilmeniz için ilk olarak network ayarlarını yapmanız gerekiyor. Bunun için ilk olarak yeni bir vmkernel portu oluşturuyoruz. Eğer uplink’lerinize güveniyorsanız veya test için yapacaksanız Maangement veya vMotion network’lerini Fault Tolerance network’u için kullanabilirsiniz.
Fault Tolerance Network Konfigurasyonu
FT kullanabilmemiz için ilk olarak FT’nin kullanacağı bir uplink ayırmanız gerekmektedir. Bu uplink üzerinde FT logging servisini aktif etmeniz gerekiyor. Bunun için ESXi’i seçtikten sonra Configure bölümüne giriş yapıyoruz. Add Networking butonuna basıyoruz.
Add Vmkernel Port
Fault Tolerance network’u için bir VMkernel Network Adapter oluşturmamız gerekiyor. VMkernel Network Adapter’i seçiyoruz ve Next ile devam ediyoruz.
New vSwitch
Select Target Device bölümünde FT network’u için yeni bir vSwitch oluşturuyorum. Eğer sizin altyapınızda yeterli sayıda uplink yok ise var olan vSwitch üzerinde bir VMkernel portu oluşturabilirsiniz. Next ile devam ediyoruz.
Add Uplink
FT için oluşturduğunuz vSwitch’e hangi uplink’in connect olmasını istiyorsanız onu seçmeniz gerekiyor. Next ile devam ediyoruz.
FT Network
Port Properties aslında en önemli bölümlerden birtanesi. Bu bölümde bu VMkernel port’unun hangi servis için kullanılacağını seçmemiz gerekiyor. Bu VMkernel portunu Fault Tolerance kullanacağımız için Fault Tolerance Logging seçeneğini seçiyoruz. Network Label bölümüne FT ismini verdim siz isterseniz bu ismi kullanabilirsiniz. Eğer Fault Tolerance network’unu özel bir VLAN’da çalıştıracaksanız VLAN ID bölümünden VLAN ‘ı tag’leyebilirsiniz. Tüm işlemleri tamamladıktan sonra Next ile devam ediyoruz.
FT IP
VMkernel portları biliyorsunuz ki TCP IP tabanlı bir network’tur. Bundan dolayı burada FT network’u için kullanacağımız Vmkernel portuna bir IP vermemiz gerekiyor. Böylece FT enable ettiğimizde bu IP üzerinden veri taşınacaktır. Next ile devam ediyoruz.
Fault Tolerance Finish
Ready to complete bölümünde yaptığımız işlemlerin kısa bir özetini görüyoruz ve Finish butonu ile işlemi sonlandırıyoruz.
Fault Tolerance vSwitch
FT için kullanacağımız Vmkernel portunu oluşturduk. Bu aşamadan sonra artık Fault Tolerance’ı kullanabilirsiniz.
Yukarıda belirtmiş olduğum Vmkernel port oluşturma işlemini tüm ESXi host’lar üzerinde yapmanız gerekiyor. Siz isterseniz FT network’unu, Management ile aynı anda kullanabilirsiniz isterseniz de benim gibi ayrı bir vSwitch oluşturup farklı bir Vmkernel portu üzerinden Fault Tolerance ‘ı kullanabilirsiniz.
Umarım faydalı olmuştur.
İyi çalışmalar.
0 notes
Text
NCSA-HC Certification NS0-146 Dumps
If want to get success in Network Appliance NCSA-HC Certification NS0-146 exam in just first attempt? If yes, then you must get help from Passquestion by downloading latest NCSA-HC Certification NS0-146 Dumps for your Network Appliance NS0-146 exam. We have here an excellent NCSA-HC Certification NS0-146 Dumps with Network Appliance NCSA-HC Certification NS0-146 questions and answers in NS0-146 PDF files. We are certain about the accuracy and validity of our NCSA-HC Certification NS0-146 Dumps and therefore we offer 100% money back guarantee. Pass Network Appliance NS0-146 exam with real NS0-146 dumps and get Network Appliance certified professional confidently.
Pass your Network Appliance NS0-146 exam with confidence with real NS0-146 questions
There are many way to prepare for your NS0-146 NetApp Certified Storage Associate - Hybrid Cloud exam.After using Passquestion NCSA-HC Certification NS0-146 Dumps, you will accept that it takes you a step closer to the Network Appliance NCSA-HC Certification NS0-146 exam success. The
NCSA-HC Certification NS0-146 Dumps
covers all the aspects of the real NS0-146 exam. Passquestion has always verified and updated NS0-146 questions and answers, which helps you to prepare your Network Appliance NS0-146 exam with less effort in short time.
Download latest Network Appliance NCSA-HC Certification NS0-146 exam questions, 100% pass your exam in the first attempt
Passquestion new updated high quality NCSA-HC Certification NS0-146 Dumps, which is your best preparation for your first time to attend
Network Appliance certification
NS0-146 exam. Passquestion NCSA-HC Certification NS0-146 Dumps are very similar with the real exam, which can ensure you a successful passing Network Appliance NCSA-HC Certification NS0-146 exam.
Share some
Network Appliance NCSA-HC Certification
NS0-146 exam questions and answers below.
Which statement is true for solid state drives used in NetApp storage systems?
A. Solid state drives are volatile.
B. Solid state drives are not hot-swappable.
C. Solid state drives write in pages.
D. Solid state drives are mechanical drives.
Answer: C
You are setting up an ESX cluster. You need to provision NFS datastores for use by all nodes in the cluster.
Which change to the virtual switch is required to support NFS data traffic?
A. Add a vmkernel port to the virtual switch.
B. Add a Distributed Virtual switch.
C. Add a VM Network port group to the virtual switch.
D. Enable Promiscuous Mode on the virtual switch.
Answer: A
Which statement describes SAN storage?
A. SAN storage is file based.
B. SAN storage is block based.
C. SAN storage is volume based.
D. SAN storage is aggregate based.
Answer: B
You are deploying a virtual AltaVault appliance on a hypervisor for the first time.
In this scenario, which statement is correct about the resource allocation for vCPU, memory, and disk space to be provisioned?
A. Resources are controlled by the hypervisor and not configurable.
B. Resources are limitless and will consume what they need.
C. Resources must be over-provisioned to ensure proper use.
D. Resources must be reserved.
Answer: D
An alert is being generated about a management network switch. These alerts are being monitored by another team and the alerts should no longer be generated.
Which action will stop the generation of the alerts for only this switch?
A. Set the polling interval to zero.
B. Disable cdpd on the node.
C. Disable cdpd on the cluster.
D. Delete the cluster-switch entry.
Answer: D
Save 35% off - Passquestion 2019 Promotion
How to best prepare for NS0-146 exam? - Passquestion NS0-146 questions and answers
For passing the Network Appliance NS0-146 exam you must have to take help from valuable NCSA-HC Certification NS0-146 Dumps available at Passquestion. The benefits of these NCSA-HC Certification NS0-146 Dumps are numerous because they help you in a professional way. I can recommend everyone a site where you can download and read recent study dumps in PDF and VCE document. Passquestion is providing original questions of Network Appliance NCSA-HC Certification NS0-146 exam.
0 notes
Text
Tids bits of vSAN 6.6
The VMkernel port is labeled as vSAN. This port is used for intra-cluster node communication and for read and writes when one of the vSphere hosts in the cluster owns a particular virtual machine, but the actual data blocks making up the virtual machine files are located on a different vSphere host in the cluster. In this case, I/O will need to traverse the network configured between the hosts in…
View On WordPress
0 notes
Text
Testing VMware vSAN 6.6.1 on VMware Workstation 14
by Curtis Brown
Introduction
VMware vSAN™ is the storage component for VMware®’s Hyper-Converged Infrastructure offering. It can be deployed (albeit with its own licensing), as a part of a VMware vSphere® cluster. The release of vSAN is generally tied to a specific release of VMware vSphere, so the 6.5 Update 1 release includes 6.6.1.
Testing VMware vSphere in a lab can be desirable for many reasons, for example training or development. However, it can be quite hardware intensive, and adding in vSAN makes matters more complicated. To properly test vSAN, we need multiple nodes and good networking (10Gb for all-flash). However, it’s possible to use VMware Workstation (or VMware Fusion® for you Apple fans) to test this in a nested environment, where a set of virtual machines running VMware vSphere are hosted on one physical system.
One of the key features in VMware Workstation 14 (and Fusion
is the addition of Virtual Machine Hardware version 14. This is significant for this exercise, as one the features of this version is the ability to add virtual NVMe drives to Virtual Machines. This is also useful as we don’t need to mess about with the host VM or guest vSphere configuration to spoof the software into thinking it has SSDs.
What’s the Shopping list?
Well, you’re going to need a machine with a decent CPU (an Intel i7 or similar) and 32GB RAM with some fast disk (SSD). It’s worth remembering that you’re going to be standing up quite a bit if you squeeze this in one machine. From my experience, you will need:
A Windows Domain Controller (for authentication, DNS etc) I keep this pretty lean with 2GB RAM and a single vCPU
A VMware vCenter 6.5U1 appliance, trimmed back to 6GB RAM (Another feature of Workstation 14 is the ability to import the OVA for the appliance straight in and configure it, which saves much messing around with VMX files or having to nest the appliance in an ESXi host VM)
Three ESXi host VMs, all configured with the following:
6GB RAM
2 vCPU
15GB disk (for vSphere ESXi binaries)
2 NICs
For vSAN, I added a 5GB NVMe as my Cache layer and a pair of 20GB NVMe as my data tier

Using this toolkit, I can build out my own vSphere cluster. In addition to this, I also use a Distributed Switch with a Management port group and a VM port group (more for tidiness than anything else). Each host needs a VMKernel for Management (adding vMotion to this also works for efficiency) and I added a separate one purely for vSAN.
Enabling vSAN
This is pretty simple – browse through the vSphere Web Client to the Cluster, go to the Configure tab, select vSAN>General and hit Configure. This will then launch a wizard that takes you through the process of enabling vSAN.

Feature wise, to keep the load down I didn’t enable de-duplication & compression or encryption. So long as vSAN is enabled on a VMKernel port on each host, the network validation should be fine.
The disk claiming is spot on. As you can see, the NVMe disks are recognised correctly as flash disks and selected for the relevant tiers based on size.

This will complete the configuration and you’ll have a vSAN:

Fixing Some Warnings…
There will be a few amber warnings that require attention.
For the simpler warnings, you’ll want to enable the Performance Service as well as update the vSAN HCL Database. If you’re not connected to the internet you can download and apply this manually using ‘update from file’. The file can be downloaded from https://partnerweb.vmware.com/service/vsan/all.json

The remaining Amber warnings are trickier. The first warning that you will encounter will be that the hardware isn’t on the vSAN HCL. (This shouldn’t be much of a surprise given we’re running this in Workstation.)
The second will be the vSAN Build Recommendation Engine Health component. This requires an internet connection and that the service is logged into my.vmware.com with credentials. For a disposable lab, this is unlikely to be desirable.
These warnings can be silenced via the Ruby vCenter Console (RVC. via either SSH or the console, log on as root and access the Shell. Then log onto RVC using vCenter credentials directed at the vCenter FQDN…)

Mark a shortcut to the vSphere cluster with vSAN:
mark (vcenter FQDN)/(datacenter object)/computers/(Cluster)
To silence the given service:
vsan.health.silent_health_check_configure -a (service) ~vsan
For example:


The following services will need attention:
vumconfig - vSAN Build Recommendation Engine Health check
controllerdiskmode – Controller Disk Group Mode
controllerdriver - Controller Driver is VMware Certified
controllerfirmware - Controller firmware is VMware certified
controllerreleasesupport - Controller is VMware certified for ESXi release
controlleronhcl - SCSI Controller is VMware certified
For example, the vSAN Build Recommendation Engine Health Check:


You can use the command vsan.health.silent_health_check_status ~vsan to check the status. -a switch can be used for specific entries.
Expanding the Cluster
If you want more nodes, then you will need to add them as additional hosts. This will allow you to test RAID5 and RAID6 Erasure Coding (four and six hosts respectively) and add capacity and performance, but you need more tin for this.
Shutting Down
To shut down the lab, you should simply:
Check that all re-sync operations are complete:
Place the hosts in Maintenance Mode with ‘No Data Evacuation’ selected and don’t move powered off VMs
Power off the hosts

With respect to setting up a vSAN lab, it’s “job done” – go celebrate!
If you’re interested in exploring the ways in which you can modernise your datacentre but not sure where to start, please contact Xtravirt, and we’d be happy to use our wealth of knowledge and experience to assist you.
About the Author
Curtis Brown joined the Xtravirt consulting team in October 2012. His specialist areas include End User Compute solutions and Virtual Infrastructure design and implementation with particular strength in VDI, storage integration, backup and Disaster Recovery design/implementation. He is a VMware vExpert 2017.
0 notes
Text
Migrating vSAN vmkernel ports to a new subnet
Migrating vSAN vmkernel ports to a new subnet
After deploying a vSAN cluster, the need sometimes arises to make changes to its network configuration, such as migrating the vmkernel network of the cluster to a new subnet. This requirement may appear for example when changing the network in which the vSAN cluster is running, or even, in a more complex scenario such as when a standalone vSAN needs to be converted to a stretched cluster.
In…
View On WordPress
0 notes
Text
How to Back Up and Restore VMware ESXi Host Configuration
How to Back Up and Restore VMware ESXi Host Configuration - Learn the command line tools needed to backup ESXi also a sample PowerCLI script you can schedule #vmware #vsphere #esxi #disasterrecovery #backupesxi #restoreesxi #hostfirmware
When thinking about disaster recovery strategies for your virtualization environment, it is easy to miss one of the important aspects of disaster recovery in your VMware environment: your host configuration. Have you ever had an ESXi host crash and you thought to yourself, man I wish I had a backup of my configuration, including VMkernel ports, storage configuration, network labels, etc? I know I…
View On WordPress
0 notes
Text
New Post has been published on
New Post has been published on https://www.tayfundeger.com/objective-4-5-configure-virtual-networking.html
Objective 4.5 – Configure virtual networking
Merhaba,
VCP-DCV Study Guide makale serimizin bu bölümünde virtual networking hakkında bilgi vereceğim. Daha önce yazmış olduğum makale serisine aşağıdaki linkten ulaşabilirsiniz.
VCP-DCV 2019 Study Guide
Virtual Networking Nedir?
Bu yazımda sanallaştırma ile birlikte gelen virtual networking hakkında bilgi vereceğim. Virtual networking bölümü aslında VMware‘de en fazla karmaşık gelen bölümlerden bir tanesidir. Ancak şunu belirtmek istiyorum ki aslında oldukça basit. vSphere ESXi yazılımını fiziksel donanıma kurduğumuzda aslında biz komple donanımı sanallalştırmış oluyoruz. CPU, Memory, Disk ve network ‘u sanallaştırıyoruz. Ben bu yazımda sizlere ESXi üzerinde bulunan virtual networking’i anlatacağım.
Virtual Networking
Yeni bir virtual machine oluşturduğunuzda bu virtual machine’in external network ile haberleşmesi için mutlaka sanallaştırma katmanı içerisinde bir virtual switch oluşturulması gerekir. Aksi halde fiziksel sunucu üzerinde bulunan uplink’ler üzerinden virtual machine’ler external network’e çıkamazlar. Yukarıda da bunun bir örneğini görebilirsiniz.
Virtual machine’ler external network ile haberleşmesi için mutlaka virtual switch’in olması gerektiğini belirttik ancak virtual switch sadece virtual machine’lerin haberleşmesini sağlamıyor. Virtual switch üzerinde aynı zamanda Management, vMotion, ISCSI, VSAN ve Fault Tolerance gibi hizmetlerin trafiklerinin geçmesinide sağlayabilirsiniz. Virtual switch ESXi katmanında bulunan bir switch’dir. Bundan dolayı vCenter Server’a ihtiyaç duymaz. VMware ortamında 2 tip switch bulunmaktadır. Bunlar;
Standard Switch
Distributed Switch
Virtual switch’in yönetimini standalone ESXi veya vCenter Server üzerinden yapabilirsiniz. Ancak Distributed Switch için vCenter Server’in olması gerekmektedir. Hatta Distributed Switch’i kullanabilmeniz için Enterprise Plus lisansına sahip olmanız gerekmektedir. Distributed Switch ile ilgili daha önce detaylı bir makale yazmıştım. Bu yazıma aşağıdaki linkten ulaşabilirsiniz.
vSphere 6.5 – Distributed Switch Mimarisi
vSphere Distributed Switch Bölüm 1 – Standard ve Distributed Switch Mimarisi
Standard Switch oluşturmak için ESXi host’a giriş yaptıktan sonra Configure > Virtual Switches bölümüne giriş yapıyoruz.
Add Networking butonuna basıyoruz.
Add Networking bölümüne giriş yaptığınızda karşınıza 3 adet seçenek çıkar. Bunlar;
VMkernel Network Adapter: Bir ESXi Server’a; Management Network, vMotion Network, ISCSI Network veya Fault Tolerance network’u eklemek istiyorsanız VMkernel port group oluşturmanız gerekiyor. Bunuda VMkernel Network Adapter bölümünden gerçekleştirebilirsiniz.
Virtual machine Port Group for a Standard Switch: Virtual machine’lerin external network ile iletişim kurması için mutlaka bir virtual machine portgroup’a üye olması gerekir. Virtual machine port group’lara siz isterseniz vlan atayabilirsiniz. Böylece oluşturduğunuz portgroup’ları farklı VLAN’larda çalıştırabilirsiniz.
Physical Network adapter: Virtual Switch’e bir fiziksel uplink eklemek istiyorsanız bu seçeneği kullanabilirsiniz.
İlk olarak bir virtual machine portgroup nasıl oluşturulur onu görelim. Virtual machine Port Group for a Standard Switch seçeneğini seçelim ve Next ile devam edelim.
New Virtual Switch
Varolan bir virtual switch’e bir virtual machine port group eklemek isterseniz Select an existing standard switch seçeneğini seçemeniz gerekiyor. Eğer siz mevcut virtual switch’in haricin yeni bir virtual switch oluşturmak istiyorsanız New standard switch seçeneğini seçemeniz gerekiyor. Ben burada New Standard Switch seçeneğini seçiyorum ve Next ile devam ediyorum.
esxi-vswitch-uplink
Oluşturduğunuz virtual switch’e bir fiziksel uplink eklemeniz gerekiyor. Eğer eklemezseniz buraya dahil edeceğiniz virtual machine’ler external network ile iletişim kuramaz. Yani dış dünyaya çıkamaz. Her uplink yanlızca 1 tane virtual switch’e connect olabilir. Bundan dolayı oluşturduğumuz virtual switch ‘e bir uplink eklememiz gerekiyor. Next ile devam ediyoruz.
Virtual-Machine-PortGroup
Virtual machine portgroup oluşturduğumuz için bu portgroup için bir isim ve VLAN ID belirtmemiz gerekiyor. Default olarak VM Network ve VLAN ID 0 olarak gelir. Eğer siz herhangi bir VLAN kullanmıyorsanız VLAN ID seçemenize gerek bulunmuyor. Virtual machine Port Group’ların kullanılma amacı aslında farklı VLAN’larda bulunan virtual machine’leri çalıştırmaktır aslında. Ben burada VLAN 50 için bir portgroup oluşturacağım için Network Label bölümüne VLAN50 ve VLAN ID bölümüne 50 yazıyorum ve Next ile devam ediyorum.
Virtual Switch üzerinde yaptığımız işlemlerin kısa bir özetini görüyoruz ve Finish butonu ile işlemi sonlandırıyoruz.
vSwitch1
Virtual machine port group oluşturuldu. Bu aşamadan sonra bu porgroup’u bir virtual machine’e atayabilirsiniz. Bunun için VLAN 50’de çalıştıracağınız virtual machine’i seçiyoruz ve Sağ Click Edit Settings’ine giriyoruz.
Edit Settings
Virtual machine’in edit settings’ine giriş yaptığınızda Network Adapter bölümünden oluşturduğumuz porgroup’u seçebilirsiniz. Bunun için Network Adapter bölümünde Browse butonuna basıyoruz.
Select Network
Virtual switch’de oluşturduğumuz Virtual machine porgroup’u seçiyoruz ve OK butonuna basıyoruz.
Bu aşamadan sonra bu virtual machine sizin belirtmiş olduğunuz porgroup’da çalışmaya başlayacaktır. Ben virtual machine porgroup’u oluştururken VLAN 50 olarak VLAN ID’yi tag’ledim bundan dolayıda bu virtual machine artık VLAN 50’de çalışacaktır.
Virtual Switch ile ilgili detayları yukarıda anlattım. Bir diğer switch ise Distributed Switch’dir. Distributed Switch ile ilgili daha önce sitem üzerinde detaylı bilgiler vermiştim. Bundan dolayı bu yazımda ekstra olarak distributed switch’e giriş yapmayacağım. Distributed Switch ile ilgili linkleri aşağıda görebilirsiniz.
https://www.tayfundeger.com/?s=distributed+switch
Umarım faydalı olmuştur.
İyi çalışmalar.
0 notes
Text
New Post has been published on VMware Virtualization Blog
New Post has been published on http://www.tayfundeger.com/objective-1-8-differentiate-between-vds-and-vss.html
Objective 1.8 – Differentiate between VDS and VSS
Merhaba,
VCP-DCV Study Guide makale serimizin bu bölümünde VDS (Distributed Switch) ve VSS (Standard Switch) arasındaki farklardan bahsedeceğiz. VCP-DCV Study Guide makale serisine aşağıdaki linkten ulaşabilirsiniz.
VCP-DCV 2019 Study Guide
Bir virtual machine’in external network ile iletişim kurabilmesi için mutlaka ve mutlaka bir sanal switch’e bağlı olması gerekir. Aksi takttirde virtual machine external network yani dış dünya ile iletişim kuramaz. Bundan dolayı mutlaka bir sanal switch bulunması gerekmektedir. VMware üzerinde 2 farklı switch bulunmaktadır. Bunlar; Distributed Switch ve Virtual Switch’dir. Ben ilk olarak Virtual Switch’den bahsedeceğim daha sonrasında Distributed Switch’i anlatacağım.
Virtual Standard Switch Nedir?
Virtual Standard Switch, ESXi bazlı oluşturulan ve merkezi bir yönetimi olmayan switch’lerdir. Yani Standard switch üzerinde bir işlem yapmak istiyorsanız bunu tüm ESXi Server’larda tek tek yapmanız gerekmektedir. Distributed Switch’de ise bu durum biraz daha farklıdır.
ESXi ve virtual machine’lere ağ bağlantısını yani network’u sağlamak için ESXi üzerinde bulunan fiziksel NIC’leri standard switch’e bağlarsınız. Virtual machine’ler, standard switch üzerinde oluşturulan portgruplara bağlanabilir. Böylece dış dünya ile iletişim kurabilirler. ESXi sayesinde sanallaştırma yaptığımız için virtual machine’lere sanai network kartları ekleyebilirsiniz. Biz buna vNIC diyebiliriz. Yukarıda bunun bir örneğini görebilirsiniz.
ESXi’i ilk kurduğunuz esnada default olarak bir standard switch oluşur. Bu standard switch sayesinde 2 farklı port group bulunur. Bunlar; VMkernel ve virtual machine portgroup’dur. ESXi’i ilk kurduğunuz esnada management network girdiğiniz için yani o ESXi Server’a bağlanacağınız IP adresini belirteceğiniz için default olarak bir VMkernel portgroup oluşur. Virtual machine’leri bu vSwtich üzerinden external network ile konuşturmak istiyorsanız bu vSwitch üzerinde bulunan virtual portgroup’a eklemek durumunda kalırsınız.
VMkernel portgroup: Management network, Fault Tolerance network, ISCSI network gibi TCP/IP network ihtiyacı bulunan network’lerde kullanılabilir.
Virtual machine Portgroup: Virtual machine’lerin bağlanacağı networktur. Burada oluşturduğunuz portgroup’lara virtual machine’leri dahil edebilirsiniz. Her bir virtual machine portgroup’a bir VLAN atayabilir ve virtual machine’lerinizi belirtmiş olduğunuz VLAN’da çalıştırabilirsiniz.
Virtual Switch Nasıl Oluşturulur?
ESXi veya vCenter Server ‘a bağlanıp Virtual Standard Switch yönetimini yapabilirsiniz. vCenter Server üzerinden virtual standard switch oluşturmak için aşağıdaki adımları izleyebilirsiniz.
ESXi üzerinde iken Configure > Virtual Switches > Add Networking butonuna basıyoruz.
Add host networking butonuna bastıktan sonra karşınıza çıkan ekranda isterseniz yeni bir VMkernet network adapter’i isterseniz virtual machine portgroup isterseniz de vswitch’e fiziksel bir network kartı ekleyebilirsiniz.
vSphere Distributed Switch:
Ben daha önce vSphere Distributed Switch ile ilgili çeşitli bilgiler vermiştim. Bu makalelerime aşağıdaki linkten ulaşabilirsiniz. Ayrıca arama bölümünden Distributed Switch yazıp arayabilirsiniz.
vSphere 6.5 – Distributed Switch Mimarisi
vSphere Distributed Switch Bölüm 1 – Standard ve Distributed Switch Mimarisi
vSphere Distributed Switch Bölüm 3 – Standard ve Distributed Switch farkı?
vSphere Distributed Switch, VMware vCenter Server ile birlikte gelir. Ancak kullanabilmeniz için Enterprise Plus lisansına sahip olmanız gerekmektedir. vSphere Distributed Switch sayesinde merkezi bir switch yönetimi yapabilirsiniz. Bu nedemek oluyor peki? 3 tane ESXi host‘dan oluşan bir Cluster’ınız bulunuyor ve Standard Switch’de bir portgroup oluşturmak istediğinizde bunu tüm ESXi host’lar üzerinde yapmanız gerekiyor. Aksi halde virtual machine farklı ESXi host üzerine geçip çalışamaz. Distributed Switch‘de ise, distributed switch’e dahil tüm ESXi host’lar tek bir işlem ile portgroup oluşturabilirsiniz.
Distributed portgorup’lar virtual machine’lere network bağlantısı sağlar ve VMkernel trafiğini barındırır. Her distributed porgroup için özel bir network tanımı yaparsınız. Burada NIC teaming, loadbalancing, VLAN, Security, Traffic Shaping gibi politikalar belirleyebilirsiniz.
vSphere Distributed Switch Bölüm 1 – Standard ve Distributed Switch Mimarisi
vSphere Distributed Switch Bölüm 2 – Virtual Machine Network’u
vSphere Distributed Switch Bölüm 3 – Standard ve Distributed Switch farkı?
vSphere Distributed Switch Bölüm 4 – Distributed Switch nasıl oluşturulur?
vSphere Distributed Switch Bölüm 5 – Distributed Switch’e host eklemek
vSphere Distributed Switch Bölüm 6 – Distributed Switch’e manuel uplink eklemek
vSphere Distributed Switch Bölüm 7 – Distributed Port Group Nasıl oluşturulur?
vSphere Distributed Switch Bölüm 8 – VMkernel’i Standard Switch’den Distributed Switch’e migrate
Distributed Switch ile ilgili daha önce bir çok makale yazmıştım. Bundan dolayı yukarıdaki makalelerimi inceleyip detaylı bilgi sahibi olabilirsiniz.
Umarım faydalı olmuştur.
İyi çalışmalar.
0 notes
Text
New Post has been published on VMware Virtualization Blog
New Post has been published on http://www.tayfundeger.com/vsan-iscsi-target-konfigurasyonu.html
VSAN - ISCSI Target Konfigurasyonu
Merhaba,
VSAN 6.5 ile birlikte gelen yeniliklerden birtaneside ISCSI target idi. VSAN 6.5 ile birlikte artık VSAN üzerinde bulunan disk’leri ISCSI servisi sayesinde başka sunuculara tanımlayabiliyoruz. Yani VSAN ISCSI Target Service sayesinde block stsorage gibi kullanabiliyoruz. Tabi bunun şuanda limitasyonları mevcut ancak ilerleyen dönemlerde bu limitasyonlarda ortadan kalkacaktır diye düşünüyorum. VSAN 6.5 relase olduğu anda bunu yazamadım oyüzden şimdi yazmak kısmet oldu 🙂 VSAN 6.6’da bu özellik halen bulunuyor bu arada.
VSAN kullanıyorsanız üzerindeki ISCSI Servisini kullanmanızın size bazı faydaları olabilir. Bunları kısaca bahsedecek olursak;
Oracle RAC deployment’ında vmdk’ları map etmek için kullanabilirsiniz.
VSAN kaynaklarını fiziksel sunucular ile paylaşabilirsiniz.
CHAP ve Mutual CHAP Authentication support’u bulunmaktadır.
ISCSI Target, storage policy tarafından korunmaktadır.
vCenter/RVC/Observer üzerinden basit bir şekilde storage management’ı yapabilirsiniz.
Limitasyonları:
Şuan için Microsoft Cluster implementasyonu desteklenmiyor.
Diğer vSphere host’ları target olarak kullanmak support edilmiyor.
3 party hypervisor’ler tarafından support edilmiyor.
Virtual machine’lerde kullanımı support edilmiyor.
Configuration Maximums:
VSAN Cluster başına maksimum 1024 LUN
VSAN Cluster başına maximum 128 Target
Target başına maksimum 256 LUN
Maksimum lun boyutu 62TB
Host başına maksimum 128 iscsi session
Host başına maksimum 4096 ISCSI IO queue depth
LUN başına maksimum 64 initiator
Not: VSAN ISCSI özelliğini kullanarak ESXi, 3 party hypervisor ‘a datastore veya RDM olarak bir virtual machine’e disk eklenilmesi şuanda support edilmiyor.
İlerleyen versiyonlarda daha farklı özelliklerinden faydalanabileceğiz.
VSAN ISCSI servisini enable duruma getirmeden önce ISCSI data’larının hangi network üzerinden geçeceğini belirtmemiz gerekiyor. İsterseniz management üzerinden bu data’yı gönderebilirsiniz ancak yoğun bir trafiğe sebep olacaktır. Bunun için ayrı bir network belirlemenizde fayda var.
VSAN cluster’ında bulunan host’larda ISCSI için ayrı bir network oluşturuyoruz.
Ben tek bir vSwitch içerisinde yeni bir portgroup oluşturdum. Siz isterseniz ayrı bir virtual switch oluşturup ayrı bir uplink bağlayıpda yapabilirsiniz. Zaten doğrusuda budur. ISCSI network’u maangement network’u etkilememesi için ayrı bir switch üzerinde portgroup oluşturulması gerekir. Ben lab ortamında bu şekilde devam ediyorum. Yukarıda ISCSI portgroup’unu görebilirsiniz.
VSAN ISCSI Target Service‘i enable duruma getirmek için VSAN cluster’ını seçiyorum daha sonra Configure > vSAN > General bölümüne giriş yapıyorum. Burada vSAN ISCSI Target Service bölümünde yer alan Edit butonuna basıyorum.
Karşımıza açılan pencerede Enable vSAN ISCSI target service seçeneğine basıyoruz. Burada Default ISCSI network bölümünden oluşturmuş olduğunu ISCSI network’unu seçmeniz gerekiyor. Benim oluşturduğum network vmk2. Vmkernel adapters bölümüne giriş yaptığınızda Device bölümünden network’unuzun ismini görebilirsiniz. Eğer ISCSI Target’da bir authentication method kullanmak istiyorsanız Default authentication bölümünden bunu belirtebilirsiniz. Ayrıca ISCSI Target’ı bir storage policy ile ilişkilendirebilirsiniz. OK butonuna basıyoruz.
ISCSI Target Service enable duruma geldi. Artık yeni bir ISCSI Target ekleyebiliriz. Bunun için Configure > vSAN > ISCSI Target bölümüne giriş yapıyoruz. Daha sonra burada yer alan + butonuna basıyoruz.
Karşımıza açılan pencerede aşağıdaki alanları dolduruyoruz.
IQN: Default olarak verilmektedir.
Alias: ISCSI’nin VSAN üzerinden bağlandığını anlamak için VSAN yazdım.
Storage Policy: VSAN üzerinde oluşturduğunuz ISCSI target bir storage policy tarafından yönetilir. Siz isterseniz burada kendi policy’nizi seçebilirsiniz. Default olarak Virtual SAN Default Storage Policy gelmektedir.
Network: ISCSI’nin kullanmasını istediği network’u seçiyoruz.
TCP Port: Default ISCSI port’u 3260’dır. Aynen bırakıyoruz.
Authentication: ISCSI’nin başka bir sunucu tarafından görülmesini istemiyorsanız Authentication bölümünden CHAP doğrulaması yapmanız gerekiyor. Ben böyle birşey istemediğim için None olarak bırakıyorum.
Oluşturacağımız ISCSI target‘a ilk LUN’u eklemek için Add your first LUN to the ISCSI Target seçeneğini seçmemiz gerekiyor. Bu seçeneği seçince;
LUN ID: Default olarak bırakabilirsiniz. Her lun ekleme esnasında burası otomatik değişecektir.
Alias: Hangi sunucuya tanımlayacak iseniz bu LUN’u onun ismini yazabilirsiniz. Ben Active Directory sunucunusuna tanımlayacağım için AD yazdım.
Storage Policy: Mevcut Storage policy’inizi seçebilir veya default olarak bırakabilirsiniz.
Size: Bu LUN’un kaç GB boyutunda olmasını istiyorsanız onu yazmalısınız.
Tüm işlemleri tamamladıktan sonra OK butonu ile çıkıyoruz.
Son durumda ISCSI disk’imiz aktif durumdadır. Artık bu ISCSI bağlantısını bir sunucuya gösterebiliriz.
Windows sunucuma giriş yapıyorum ve ISCSI Initiator’u açıyorum. Burada Target IP’mizi yazıyoruz. ESXi host’a vermiş olduğunuz VMkernel port’un IP’sini yazabilirsinz.
Discovery bölümüne geldiğinizde ISCSI Target’in çalıştığını görebilrisiniz. vsan-n2-65 üzerinden şuanda bağlı durumda.
Disk management bölümüne giriş yaptığınızda ISCSI olarak tanımladığımız 5GB’lık disk’in geldiğini görebilirsiniz.
VSAN üzerinde kullanılan ISCSI Target şuanda windows sunucularda unsupported durumdadır. Ben makalede kolay birşekilde anlaşılır olması için bu şekilde anlattım.
Umarım faydalı olmuştur.
İyi çalışmalar.
0 notes
Text
New Post has been published on VMware Virtualization Blog
New Post has been published on http://www.tayfundeger.com/esxi-6-5-basics-iscsi-datastore-nasil-eklenir.html
ESXi 6.5 Basics - ISCSI Datastore Nasıl Eklenir?
Merhaba,
ESXi 6.5 ile birlikte artık Browser üzerinden işlem yapıyoruz. vSphere Client’ı artık kullanmadığımız için Web arayüzü üzerinden işlem yapmak biraz zor olabilyor. Ancak zamanla alışacağınızı düşünüyorum. Bu yazımda ESXi 6.5 üzerinde ISCSI datastore‘un nasıl ekleneceği yönünde bilgi vereceğim.
ESXi üzerinde bir virtual machine create ederken bu virtual machine’in barınacağı datastore’u belirtmeniz gerekir. Datastore olarak isterseniz local istersenizde farklı protokollere ait datastore’lar kullanabilirsiniz.
ESXi – ISCSI Datastore Nasıl Eklenir?
Öncelikle ESXi 6.5 host’umuzun management IP’sini browser’a yazıyor ve root bilgileri ile login oluyoruz.
ESXi 6.5‘a login olduktan sonra Storage bölümüne giriyoruz. Buradan ESXi’in üzerinde bulunan controller’leri görebilirsiniz. Biz ISCSI datastore ekleyeceğimiz için Model bölümünden ISCSI Software Adapter seçeneğini seçiyoruz. Daha sonrasında hemen yukarıda bulunan Configure ISCSI butonuna basarak ISCSI için bağlantıları hazırlamaya başlıyoruz.
Ilk olarak ISCSI Enabled duruma getirmemiz gerekiyor. Daha sonrasında burada karşımıza bazı seçenekler çıkıyor. Bunları kısaca inceleyelim.
CHAP authentication: Storage üzerinde ayarlamış olduğunuz datastore’ların farklı bir host tarafından erişilmesini istemiyorsanız veya farklı bir sunucunun bu ISCSI datastore’unu görmesini istemiyorsanız CHAP doğrulaması yapabilirsiniz.
Network port bindings: Bu bölümden ISCSI trafiğinin geçirileceği spesifik bir vmkernel adapter’ı belirtebilirsiniz. Eğer ESXi üzerinde herhangi bir konfigurasyon yapmadıysanız default olarak management port’u üzerinden ISCSI trafiği geçecektir. Port binding ile ilgili yazıma aşağıdaki link’den ulaşabilirsiniz.
VMware ESXi ISCSI Port Binding
Static target: ISCSI storage üzerinde oluşturduğunuz her LUN’un bir target adresi vardır. Bu adres iqn… ile başlar. Oluşturduğunuz LUN’un IQN’ini buraya yazmanız takdirde, Address bölümünde belirteceğiniz ISCSI storage IP’si üzerinden sadece bu LUN eklenecektir.
Dynamic target: Bu bölümde ISCSI storage’in IP adresini yazmanız yeterlidir. ISCSI storage üzerinde bulunan tüm LUN’ları ESXi host otomatik olarak görecektir.
Ben burada Static target’ı kullandım ve storage’ım üzerinde bulunan IQN numarasını ekledim. Siz isterseniz Dynamic targets bölümüne sadece storage’ın IP adresini yazarak LUN’ları gösterebilirsiniz. Save configuration bölümünden bu sekmeyi kapatıyorum.
Daha sonrasında Datastore bölümüne giriyorum ve burada New Datastore butonuna basıyorum. Benim hali hazırda VCSA65-DS1 isimli bir datastore’um bulunuyor. Ben ekstra olarka bir datastore’da ekleyeceğim.
New Datastore wizard’da karşıma 3 tane seçenek çıkıyor.
Create new VMFS Datastore: Yeni bir datastore oluşturmak istiyorsanız bu seçeneği seçiyoruz.
Increase the size of an existing VMFS datastore: Var olan bir datastore’un boyutunu değiştirmek istiyorsanız bu seçeneği seçiyoruz.
Mount NFS datastore: NFS bir share’i mount etmek istiyorsanız bu seçeneği seçiyoruz.
Ben yeni bir datastore oluşturacağım için Create new VMFS Datastore seçeneği ile devam ediyorum.
Eklemiş olduğum LUN’u seçiyorum ve Next ile devam ediyorum.
Bu LUN’u eklerken isterseniz belli bir kısmını datastore olarak ekleyebilirsiniz ancak bu önerilmeyen bir durumdur. Bunun için herzaman Use full disk seçeneğini kullanmaya özen gösterin. Datastore’un VMFS5 mi VMFS6 mi olacağını belirtiyoruz. VMFS 5 ve VMFS 6 arasındaki farkları aşağıda görebilirsiniz.
VMFS5 ve VMFS6 Arasındaki Farklar Nelerdir?
Finish butonu ile Datastore’umuzu oluşturuyoruz.
Finish butonuna bastıkdan sonra yukarıdaki gibi bir uyarı ile karşılaşacaksınız. Burada bu disk’İn komple silineceği bilgisi veriliyor. Yes butonu ile devam ediyoruz.
Yukarıda görüldüğü gibi datastore’umuz eklendi. Artık yeni bir virtual machine oluştururken bu datastore’u seçebilirsiniz.
Umarım faydalı olmuştur.
Iyi çalışmalar.
0 notes
Text
New Post has been published on VMware Virtualization Blog
New Post has been published on http://www.tayfundeger.com/vsphere-6-5-distributed-switch-mimarisi.html
vSphere 6.5 - Distributed Switch Mimarisi
Merhaba,
Daha önce Distributed Switch ile ilgili birçok bilgi vermiştim. Ancak bazı konularda güncelleme yapmam gerekiyor. Özellikle vSphere 6.5 ile birlikte çeşitli yenilikler geldi. Daha önce yazmış olduğum Distributed Switch ile ilgili yazılara aşağıdaki link’den ulaşabilirsiniz.
vSphere Distributed Switch Bölüm 1 – Standard ve Distributed Switch Mimarisi
vSphere Distributed Switch Bölüm 2 – Virtual Machine Network’u
vSphere Distributed Switch Bölüm 3 – Standard ve Distributed Switch farkı?
vSphere Distributed Switch Bölüm 4 – Distributed Switch nasıl oluşturulur?
vSphere Distributed Switch Bölüm 5 – Distributed Switch’e host eklemek
vSphere Distributed Switch Bölüm 6 – Distributed Switch’e manuel uplink eklemek
vSphere Distributed Switch Bölüm 7 – Distributed Port Group Nasıl oluşturulur?
vSphere Distributed Switch Bölüm 8 – VMkernel’i Standard Switch’den Distributed Switch’e migrate
vSphere Distributed Switch Bölüm 9 – VMnetwork’u Standard Switch’den Distributed Switch’e migrate
vSphere Distributed Switch Bölüm 10 – Distributed Switch Konfigurasyonu Export
Bu yazımda vSphere 6.5 Distributed Switch mimarisinden detaylı olarak bahsedeceğim. Eğer lisans’ınız yeterli ve ortamınızda birden fazla ESXi host bulunuyor ise distributed switch kullanabilirsiniz. Network’de bir VLAN eklemek istediğinizde tek tek host’larda virtual switch üzerinde konfigurasyon yapmanıza gerek bulunmuyor. Distributed Switch’in yönetimsel anlamda oldukça faydalı özellikleri bulunmaktadır. Tabi bunun yanında virtual switch’e göre bir hayli farklı özelliği bulunmaktadır.
vSphere üzerinde bulunan network switch’i iki mantıksal bölümden oluşur. Bunlar data plane ve management plane olmak üzere ikiye ayrılmaktadır. Data plane üzerinde switch üzerinde filter, tag, packet switching işlemlerini uygular. Management plane ise, data plane’i yapılandırmak için kullandığımız bir yapıdır. Bir vSphere Standard Switch data ve managemen plane’i barındırır ve standart switch’de bir konfigurasyon yaparken her host başına bu işlemi yapmanız gerekmektedir. Ortamda birden fazla host var ise tek tek tüm host’larda Standard Switch konfigurasyonunu yapmanız gerekmektedir. Distributed Switch’de ise bu durum biraz daha farklıdır. Burada data plane ve management plane birbirinden ayrılır. Management plane doğrudan vCenter Server ile ilişkilidir ve Datacenter seviyesinde işlevselliği vardır. Data Plane ise host seviyesinde işlevselliği vardır. Distributed Switch’in data plane bölümüne host proxy switch denir. vCenter Server ‘da (management plane’de) oluşturduğunuz ağ yapılandırması otomatik olarak tüm host proxy switch’lere (data plane) iletilir. vSphere Distributed Switch kullanılarak virtual machine network’u veya Vmknernel port’ları oluşturmak için iki yöntem kullanır. Bunları kısaca anlatalım.
Uplink Port Group:
Distributed Switch oluşturulması sırasında bir uplink portgroup veya dvuplink portgroup tanımlanır ve bir veya daha fazla uplink bu switch’e bağlı durumda olabilir. Uplink sayesinde host’ların fiziksel bağlantısı sağlanır ve bu uplink’ler aynı zaman fail over ve load balancing işlemlerinide gerçekleştirirler. Fiziksel NIC’leri distributed switch üzerindeki uplink’lere eşlersiniz. Host seviyesinde her fiziksel NIC, belirli bir ID’ye sahip olan bir uplink portuna bağlıdır. Failover ve Load balancing policy’lerini uplink’ler üzerinden ayarlarsanız bu tüm host proxy switch’lerine otomatik olarak dağılacaktır. Böylece her host üzerinde tek tek ayarlama yapmadan yapmış olduğunuz işlemler tüm host’larda uygulanmış olacaktır.
Distributed Port Group:
Distributed Portgroup‘lar virtual machine’lerin network bağlantılarını ve VMkernel trafiğini barındırır. Distributed Portgroup’lar üzerinde NIC teaming, failover, load balancing, VLAN, security, traffic shappingve diğer policy’leri oluşturabilirsiniz. Distributed Port Group üzerinde yaptığınız tüm değişiklikler host proxy switch (data plane) sayesinde tüm host’lar üzerinde geçerli olur. Zaten distributed Switch’inde burada kullanma kolaylığı ortaya çıkar. Örneğin vlan için oluşturduğunuz bir porgroup bu distributed switch ‘e dahil tüm ESXi host’larda geçerli olur. ESXi 5.5 ve sonraki sürümlerinde distributed port sayısını dinamik olarak artırabilir veya azaltabilirsiniz. Bir distributed port group oluşturduğunuzda default olarak 128 port tanımlı gelir. Eğer yapınızda birden fazla distributed portgroup var ise ve hepsi default olarak 128 port tanımlı durumda ise muhtemelen configuration maximum’a takılırsınız. Ondan dolayı kullanacağınız port’u tanımlamanız herzaman sizin için daha iyi olacaktır.
NIC Teaming and Port Allocation on a vSphere Distributed Switch:
Yukarıdaki topolojiye 3 VM network oluşturulmuş ve 2 tane’de VMkernel network’u oluşturulmuş durumda. Distributed Switch’i oluşturduğunuzda ilk olarak uplink port group’lar oluşur. Bu uplink’lere kaç adet Fiziksel NIC bağlayacağınızı distributed switch’i oluştururken belirleyebilirsiniz. Oluşturma esnasında host’ları uplink’ile ilişkilendirirsiniz. Yukarıdaki örnekte VM network için 4 uplink oluşturulmuş durumda. Bu uplink’lere her iki host’da bulunan fiziksel NIC’ler eklenmiş durumdadır. Eğer bu işlemleri yapmazsanız VMnetwork’e bağlı virtual machine’leriniz ve Vmkernel network’unuz external network ile haberleşemez.
Packet Flow on the Host Proxy Switch:
ESXi host tarafında, virtual machine’lerden ve VMkernel‘den gelen paketler fiziksel network’e ulaşması için belirli katmanlardan geçer. Yukarıdaki topolojiye göre, ESXi host 1 deki VM1’den gönderilen bir paket ilk olarak VMnetwork distributed portgroup‘unun 0 numaralı portuna erişir. Bu aşamadan sonra Uplink portgroup’da virtual machine’ın network’u uplink port 5 veya uplink port 6’dan çıkış yapabilir. Uplink 5’den network çıktığında vmnic0 üzerinden external network’e erişir. Aynı şekilde uplink port 6’dan network çıktığında vmnic1 üzerinden external network’e erişir.
Umarım faydalı olmuştur.
İyi çalışmalar.
0 notes